Welcome to Legal Tender Farm

Welcome to Legal Tender Farm

Thursday, June 20, 2019

Trimming the Wisteria

We have the very large wisteria arbor that grows wildly out of control.  Each year, I have to trim it back so that I can mow under and around the arbor.  The wisteria continually puts up new shoots all over the place and if I don't mow under and around it, the vines get bigger and bigger and I'm afraid this would turn into one big wisteria jungle.

But last year, I never got around to it.  The vines had draped down to make a solid wall around the whole thing.  It would be neat to have a little fort under there if kids lived here.  Or, a nice little "room" to host an afternoon tea...if I was an English aristocrat.  Alas, there is nobody here to take advantage of the wisteria fort.

So, I decided to get to work on this mass of vines.  This picture shows the end where I haven't cut anything back yet.  The whole arbor looked like this.

You can see on the ground where the shade has killed the grass, but somehow, the wisteria can sprout and survive in that shade.  Normally, that is solid St. Augustine grass there.

I chose to do it this week, in part, because I have a little helper.  At first, I gave him some shears and showed him how to cut the vines, but that didn't work out too well.  
So, I gave him a job any little guy would like...driving.
He picked up the vines as I clipped them and loaded the golf cart.

When he got a full load, he drove - by himself - down to the burn pile, unloaded the vines into the pile, then drove back for another load.  I made a couple of trips with him until he got confident enough to go by himself.

He was a great help.  I usually hate this part of the job and have been known to just leave the vines where they fall, let them wilt, then mow over them with the mower.  Don't tell hubby!  He thinks I'm too hard on the mower, and he's probably not wrong.


Monday, June 17, 2019

Baaybee Skunk, Nuh-nuh, Nuh-nuh, Nuh Nuh

Hey, long time, no see.  This was too cute not to share.

It's that time of year again in which I walk the goats from the barn to the paddock in the morning and back again to the barn in the evening.  A couple of days ago, on our morning walk, I heard a funny little squawking noise in the tall hay grass off to the side of the path.  It sounded like a baby bird in distress.  I can't resist any baby in distress, so, of course, I stopped to check it out.

I followed the sound and the slight rustling in the grass until I came upon this...


Not a bird.

A baby skunk about the size of an eight week old kitten.  It's mother was nowhere in sight.  As I approached, it stomped it's tiny little front feet and sort of hissed at me.  It tried mightily to spray me, slinging it's little hind end up and over several times.  But, it was hindered by the grass, and I don't think it was old enough to spray anyway.

Adorable.  But, this was an animal that I could not help.  I checked on it again on my way back to the barn that morning and it was still alone.  But, we really don't want skunks hanging around.  They get in our barn and our garage and stink up the place.  So, good luck to the little guy, but he's on his own.

Thursday, December 20, 2018

And, There's This


I'm learning to play the drums.  I've been playing now for about a year and it's great fun.  I suspect it's all kinds of good for my brain and my coordination as I'm aging just as fast as anyone.

And, as everyone keeps pointing out to me, it's a great stress reliever and I really need a stress reliever in my life right now.  I never have been a person that gets really stressed, so this is something new to me and I must say, I don't think I'm handling it all that great.


Tuesday, December 18, 2018

Hello, Chesterfield

Hey, y'all remember this?  Ye Ol' Chesterfield?  Yeah, that one that I started working on reupholstering, like, three years ago?

I finally got it stripped down to, nearly, bare bones.  I'm trying to decide if I need to replace springs.  If I don't, then it's ready to be reupholstered.  If I do replace the springs, I'll have to find out where to buy new ones and also figure out how to do it.  So, I'm just in the brainstorming phase.  But, ah, how good it feels to have that stripped down after all this time!


Monday, December 17, 2018

Incommunicado

I know I've been MIA for a while.  I had become burnt out on farming and took the year off from gardening last year since we were overwhelmed with the bathroom remodel.  Ugh, you should see the garden plot after being neglected for one season.  Let's just say...bermuda grass is the devil.

I also took the year off from milking goats, not really by design, but that's just how it turned out and it was fine with me because, well, burnout.  Since our Nubian "Billy" had died, I decided to try my hand at raising some Kinders, which are a cross between Nubian and Pygmy.  So, I bought a young Pygmy buck.  We gave him the equally original name of "Buckie" (courtesy of daughter).  He's naturally polled, meaning born without horns, which I liked because there was a high likelihood of his offspring being polled.  I really liked the idea of having naturally polled kids so I don't have to worry about horns.

An interesting little tidbit of information is that if you breed two naturally polled goats, it is quite possible that the offspring cannot reproduce; sort of like mules (which are a cross between a donkey and a horse) are sterile and cannot reproduce mules.  Since none of my female goats have polled ancestry, I wasn't worried about that.  But, I forgot one of the most important things when I bought Buckie.  And, that was to ask if both of his parents were polled.  DUH.  So, I wasn't sure he was going to be able to impregnate any of my females.

Well, it turned out he was capable and he impregnated three out of the five that I intended to breed.  I'm not sure why two of them didn't get pregnant.  They were the taller of the five and with Buckie being a younger Pygmy, maybe he just couldn't reach.  Billy had a 100% success rate, so I know it didn't have anything to do with my girls.  Anyway, two of the pregnant does were "first fresheners", meaning that was the first time they had given birth.  It's not a good idea to milk first fresheners because they are building up their milk supply and you just don't get enough from them to make the effort worthwhile.  They both had twins, which were Kinders and three out of the four were naturally polled.  The third pregnant female was a Boer, which is a meat goat.  She lost her kid because she went into labor Memorial Day weekend and by the time I was certain she was in labor and that she was having trouble and I was able to get her to the vet, the baby had already died and they had to pull it out of her.  Gruesome and sad.

Anyway, that's the series of events that led to no milking this year.

And, there are some pretty heavy things going on in my life right now that have drastically affected our lives and put me in a funk.   I hope to some day be able to write about what's happening to us, but because it involves serious legal issues, I can't write publicly about it at present.   So, because I have to be in the right frame of mind to write and I have to have something to write about, then being in a funk, and having nothing interesting to say means no blogging.

I did have this though...

I decided rather late in the year to go ahead and breed my goats, so on December 1st, I set myself to the task of separating the goats into categories:  those to be bred from those that are too young to be bred or retired.  Those to be bred had to be moved into the pasture with Buckie, the wethers, and Kip the guardian donkey.  It's a juggling act in which I have to move some here, some there, pen some up, close gates, open gates, etc.  It's easier to move goats as a herd rather than to try to take a single goat away from the herd and it's usually easier for me to do it by myself because when Husband comes out with me, the goats get suspicious an won't cooperate.  Husband was gone at the time, but I didn't mind since I planned to do it myself anyway.  Oh, and they'll do anything for food, so I carried a bucket of sweet feed with me to bribe them.

If you look at the picture at the top of this page of our driveway, it will help you understand the logistics of this.  You can see the wood fence that lines both sides of the drive.  And, you can kind of see that the area on the other side of the wood fence is cross-fenced into paddocks.  Buckie's paddock is on the left side of the driveway and the girls are on the right.  The chainlink pen was not up when I took that picture, but it is right up against the wooden fence on the right.

We have this six foot tall portable chainlink pen set up in one of the paddocks for the purpose of corralling the goats when we need to, like, when we need to catch a sick one or treat for parasites, etc.    My idea was to get all of the girls into the pen and then let out the ones I wanted to breed.  Then, I would walk them as a herd over to Buckie's paddock.

Well, it all went downhill fast.  They were all frantic for the sweet feed, but they did not all go in the pen at once.  But, since two of them that didn't go in were ones that I wanted to breed, I went ahead and walked them over to Buckie's paddock.  As soon as I put them in there, it was mayhem.  Buckie went crazy chasing them all over the place.  That got the two very large wethers in a tizzy and they were running all over the place.  Then Kip got caught up in all of the excitement and went crazy.  He totally forgot his "guardian" role and started trying to stomp the females.  So, the females were running, with Buckie chasing them, and Kip chasing and trying to stomp.

The best idea I could come up with to save the lives of the nanny goats was to just get Kip out of the paddock, which I finally did.  He ran free for the rest of this process.  Then I went back to rounding up the rest of the goats into the pen and pulling out the ones to be bred.

So, while Kip was running free and braying, Buckie was chasing the girls, the wethers were running around the paddock, the girls in the pen were wildly milling around trying to get to the food bucket in my hand and all the goats were bleating.  I was standing at the gate of the chainlink pen getting ready to pull another nanny goat out when Pansy, our bossy Boer, head butted another goat, slamming her into the chainlink.  That slammed the steel post of the pen into my forehead.  It stunned me for a moment, then the blood started flowing down my face.  I happened to have a tissue in my pocket so I grabbed it and held it against my forehead.

When you're in the middle of moving goats you can't just...stop.  So, I orchestrated the rest of this debacle one-handed.  One hand pressing the bloody tissue tightly to my head to, hopefully, stop the bleeding, the other hand, carrying a food bucket, opening and closing gates, dragging goats by the horns out of the pen...

I finally got all of the girls separated the way I wanted, got the breeders into Buckie's paddock, moved the non-breeders out of the pen, closed the gate to that paddock, went and retrieved Kip-the-Free and put him in a paddock by himself for a few days until he could be trusted not to be Kip-the-Goat-Slayer.

And, this is what I got for my troubles.

This is after a couple of days of being treated with neosporin and covered with a bandaid.  I had a lump for several days, but it didn't bruise up nearly as bad as I thought it would.  I think I'll have a Harry Potter scar, though.


Thursday, July 12, 2018

The Case of the Missing Peaches

I was gone for 24 hours.  Twenty-four hours, y'all.  One. single. overnight. trip.  My plan was to pick the rest of those peaches when I got back because they just need a day or two more to ripen.

This morning, I got my pickin' sacks, took the golf cart (because I have to stand on the back of it to reach the higher limbs) and went out to our little orchard.  This is what I saw.

No, this can't be.  Maybe my contacts are a little fuzzy **takes off sunglasses to see better**.

 Get closer.  Peer up into the branches.  Do you see any peaches?  No peaches.  No peaches anywhere.  What?

So, I'm thinking, thinking, incredulous, but thinking...Did the birds eat all the peaches?  Did the squirrels come pick them and eat them all in one night?  We had a rainstorm last night, the wind wasn't bad, but is it possible that they could have been blown off?  **starts looking at the ground**


Peach pit here, peach pit there.  Seriously?  Those stupid squirrels!

But...wait, what's this?  What are those footprints?  They could be mine, made from the heel of my shoe.  But, the last time I was out there, it was dry and hard and I walk so softly that Husband never hears me coming and I scare him out of his shoes.

Man, that looks like donkey hoof prints.  But, it can't be.

The donkeys are grazing serenely and innocently in their pastures.  See?  It must be deer.  They don't look like deer prints, but there is no other explanation.  The donkeys can't jump the fence.  The deer can.  But, why didn't Harry Dog and Ginger Girl chase them off like they usually do?

So, I walk around having a look at the two other peach trees, which have not a single peach on them either.  Then, what's this?

Now, THIS, this is donkey poop for sure.

**lighbulb goes off in head**

While I was gone, Husband mowed the pasture behind the pond.  To mow the pasture behind the pond, he must open the gate to said pond pasture, drive the tractor through said gate, get out of the tractor and CLOSE said gate so that the donkeys and goats don't go out of said gate.  The only problem is, for some inexplicable reason, after living here for ten years and leaving gates open countless times and having to try, unsuccessfully, to herd the goats and donkeys back into the pasture, and having to call ME to come round them up...Husband STILL leaves gates open.  So, I look over to the gate.  Sure enough.  Gate wide open.

Yeah, now it's closed.


So, either yesterday while Husband was mowing, or last night while we were sleeping, the donkeys came out of the pasture, ate every single delicious peach on every tree


 (except for ONE small, hard, unripe one).  I have no idea how they reached the highest ones that were at least 10 feet off the ground, unless they stood on their hind feet to reach them.

Then, they started in on the plum tree.  But, either they deemed the plums not ripe enough, or they were just so stinkin' full of peaches, that they couldn't eat another bite.  They only left a couple of plum pits on the ground.  Then, they ambled back into the pasture as if nothing ever happened.

I'm surprised they don't have a stomach ache this morning, but they're still standing, so I guess they just enjoyed their feast.  And, me?  I'm royally ticked off because those were some of the best tasting peaches I've had in a long time.  But, guess what we learned?  If we leave the gate open, the donkeys might come out (well, WILL come out), but...they'll go back in...eventually.  Which is all well and good if you don't care about what they'll do while they're roaming around free.

Monday, July 09, 2018

Peach Syrup

Last year my fruit trees did not bear one piece of fruit.  They didn't even bloom.  I don't know the reason for that, but if something like that happens to commercial growers, what a catastrophe that would be!

So, they must have saved up all their energy for this year because my three peach trees are loaded.  One of my three plum trees is also loaded.  I mean, branches drooping and one even breaking, loaded.  Even my sad little apple trees, that have never produced anything except maybe one hard little crabapple looking apple, actually have some little apples on them.

Anyway, I've been picking the peaches and they are really delicious.  So far, I've frozen about three quarts of peaches.  I know that doesn't sound like much, but my trees are still fairly small; they aren't all ripe yet; and, lots of the fruit fell off the tree before ripening, has been pecked by birds or ruined by ants.

I saw a pin on Pinterest in which the pinner made peach syrup from her scraps after canning her peaches.  It was pretty simple, so I thought I'd give it a try.

All you have to do is put all your scraps - pits, peelings, etc. in a pot and put enough water in the pot so that you can see the water, but it doesn't cover your scraps.

Bring to a boil, then turn it down and let it simmer for about 45 minutes.  Strain the juice through cheesecloth into a large measuring cup.  Put the juice into a saucepan and add twice the amount of sugar as you have juice.  E.g. I ended up with two cups of juice, so I added four cups of sugar.  Simmer and stir until all sugar is completely dissolved.  

The syrup can be canned with whatever method you want.  I just poured mine in a clean jar and will keep it in the refrigerator.  It is really quite delicious.  I plan to use it in drinks like peach tea and peach lemonade.


Saturday, March 24, 2018

Full On Bohemian Mode

If you've read my blog, you know that I have an unrequited love for Bohemian decor.  It was unfortunate that my RV/Vardo project got sidetracked because of the leak, because that Bohemian Behemoth inside me must be expressed in something other than or, in addition to, my clothing (I'm a closet hippie).

So, it's happening, y'all.  My bathroom renovation project has opened a whole new world for me.  I was able to bring a few boho elements into the bathroom and they have spilled out into the bedroom and it is now no-holds-barred.

First up, macrame, baby.  Yeah, I said MACRAME.  Of course, macrame has made a huge comeback from the 1970's and it's everywhere.  I used to do macrame way back then and I made several large elaborate plant hangers.  I wish I had those now.  But, alas, they are probably in a landfill by now, or, if I'm optimistic, they could be in some vintage shop somewhere.

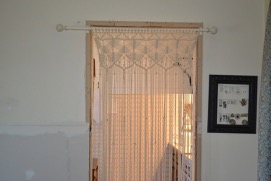
Anyway, since I didn't put a door on the entryway between our bedroom and bathroom, I decided to make a macrame curtain for just a wee bit of extra privacy.  I mean, it doesn't really cover the door and we'll probably keep it pulled back all the time anyway, but it's a little extra something and a fun project for me.

I found a pretty pattern on-line and downloaded it only my computer.  The instruction said to use 8mm cotton cord/rope, so I ordered that from another site.

Two spools.

Then I cut all my cord to the lengths as instructed.

I hung a rod over my door temporarily so I could work on the curtain.

It just took a few days.  I had forgotten how easy and fun it is to macrame.

This will be taken down and rehung higher after I get my new door casing up.

Master Bathroom Renovation, Final Reveal

To start at the beginning of this trippy journey, go to Part One.

Our bathroom is finally done.  I'd like to say without this caveat "except for the door to the throne room", but I can't because I haven't found a door that I like yet.  It will be installed "barn door" style on a sliding track some time in the near future.  But, our bathroom has been fully operational for about a month now and I'm super excited that it is beautiful and ...DONE!

I read back through all the renovation posts and saw that on December 8th I posted "we're in the homestretch".  Wasn't that a riot?  It took us almost three more months to finish from that point.

Anyway, back to the post at hand and pictures of the project that we devoted our lives to for the past six months.


I already posted a picture of this cabinet in a previous post, but this is right at the entrance.  I'll be painting this at some point, color TBD.

Opposite the cabinet is the double sink/vanity area.  We built niches into the wall by each of our sinks.  Of all the things to tile, those were the easiest.  I used the medallion accent tile that I used in the shower with the medallion offset in each niche.

I chose these wall mounted faucets by Delta.  They were just about the only matte black wall mounted faucets that I could find that didn't cost an arm and a leg.  Husband installed all of the plumbing fixtures rather than paying a plumber to come back out to do it.

There was no good place to put towel bars near the vanity, so we put this hook underneath the countertop.

It's working out just fine.

This is a view of the vanities from inside the bathroom.  Right in the middle of my "modern farmhouse" bathroom remodel, I just had this idea that it had to have some "bohemian" elements to it.  That rug is part of my bohemian expression.  I felt like I had to have some red in there, which is inexplicable, because I really don't do red.  Something inside me has snapped.

The view from the vanities into the small open area of the bathroom.  More bohemian - a colorful rug and patchwork stool.  I really needed somewhere to sit while getting dressed because I was having to walk back and forth from bedroom to bathroom while getting ready.  I was looking diligently for a pouf to set in there, but I realized I had this little stool that would be perfect.  It just needed to be reupholstered, which I did quickly.

The light fixture in the open area.

So, we did finally wimp out and we hired someone to tile the shower.  I'm so, so glad that we didn't have to do that and they did do a good job.  But, if I compare their work to ours...we really did just as good as they did.
We put two niches in the shower and used Delta faucets in there, too.  There's an overhead shower and a handheld one.  All in matte black.

We put the valve for the shower on the side wall near the entrance so that we can turn it on without getting sprayed with cold water.  The handle that is under the shower head is a diverter for the handheld shower unit.

One problem we had was with the arm that came with this shower head.  While I was trying to decide on fixtures, I decided against having the rain shower that sprays directly down because, even though I really liked the modern look of it, I didn't think I'd like to have the water pouring straight down onto me.  So, I ordered a fixture that had a short angled arm.  But, when we got it installed and turned it on, the water sprayed right past the shower and out into the room.  Even with the head tilted all the way down, it sprayed way too far.  And, as you can see, we don't have a shower door or wall and we didn't want to stand outside the shower to take a shower, nor did we want to flood the room.  So, we pondered over this for a while and decided, short of buying a whole new fixture, we would just replace the arm with one that aimed the head straight down (which is what I was trying to avoid in the first place).  Of course, our little town doesn't have anything like "matte black".  That's way too fancy.  So, husband bought a cheap chrome shower arm and I spray painted it matte black.  Voila.  Who will ever know?  Anyway, that solved the problem and we were back on track.
As an aside, I was right about the rain head.  To keep my face out of the stream of water, but keep my body in, (because, who wants to stand out of the hot water stream and freeze while taking a shower?), I have to tilt my head way back.  I'm not crazy about that.  If you don't care about water in your face, then it's no big deal, but I never did like water on my face and still, as a grown woman, do not like water pouring down my face.  I just don't, so shut up.

So, you can see how the shower is positioned in the room.  We can walk directly in from the outside when we're super dirty from gardening and what not.  I found that cute little cedar stool in a shop in town.  It's a perfect little shower stool.  
So, the tile.  For the shower walls, I used a large subway format, matte white tile from Interceramics. The medallion tiles came from Wayfair.com.  For the rest of the room, I used a matte white octagon with a "dot" from Daltile.  Although, you can buy the exact same look from Lowes and we did have to run to Lowes to get an extra box because we ran out toward the end.
Since the two different shaped white tiles meet together on that one wall and I didn't want just a straight line there, I had the tilers cut and fit them in a random waterfall pattern right there.  I love that look.  In the picture, the tiles look like they are a different color, but it's just because the octagon is small and there is more grout.  It gives the illusion of a different color because the grout is a tan color (Haystack is the color).

Here's a better look at the cut tiles.  I knew I wanted that done and was dreading it because it was a lot of intricate tile cutting and I wasn't sure we'd be able to do it.  Since we hired the shower tiled, I just drew them a picture of what I wanted and left it to them.  I think they did a great job.


I got the towel hooks from Hobby Lobby.

The water closet.  I used to keep the toilet bowl brush in the unused tub, but since that's gone, I needed another solution.  I figured, "why not something attractive?"  So, I went on a scavenger hunt in my house and found that tall vase (to the left of the toilet).  Perfect.  (I apologize once again for the blurry pictures.  I just can't figure out how to fix it on Blogger).

Since the shower used to be to the right of the toilet, we left the plumbing in that wall and installed a hot/cold water handheld bidet.  I love this!  TMI, I know.

Here are a few other little luxuries that I included in the design.

A small electric wall heater with a timer for a little extra warmth on cold winter days.

This mirror was one that I had in my old bathroom, but it was chrome and didn't go with anything.  I shopped for a new one, but couldn't find anything in gold or brass that wasn't either outrageously expensive or ugly.  So, I just spray painted the one I had and it's perfect.

I searched for a six inch wide trash can to go between the vanities, but I couldn't find anything that narrow and I got really sick of shopping.  So, I just shopped my house.  I had this old chamber pot that had gotten dented and husband had hammered it out.  It was just sitting in the garage for over a year.  Turns out it was perfect for my modern, bohemian farmhouse bathroom.

And I LOVE this!  It's a shower exhaust fan with a bluetooth speaker.  So, I can jam in the shower with my tunes.  How cool is that?

And, the switch plates that mimic my farmhouse door casings.  I was glad to find these and not have to use just plain ol' flat plates.

The End.


Saturday, February 17, 2018

Master Bath Renovation, Part Ten

To read about our master bath renovation from the beginning, go to Master Bath Renovation, Part One.

We're so close, I can taste it.  The toilet room is completely finished.

I found the shelves at the First Monday Flea Market and the brackets from Hobby Lobby and finally got them installed last night.  There have been all kinds of issues with everything, every step of the way and this particular part of the project was no exception.

The wood is (supposedly) from an old Cotton Mill in Tenaha, Texas and sold to me by a man at the flea market that had taken the wood and turned it into trays with handles on them.  When I told him what I was looking for (rustic wood to use for shelves), he offered to take the handles off, cut them to fit and finish the ends.  He did it within an hour while I shopped.

Being as how it is old barn wood, and rustic, there were issues with it being warped and uneven, so we had to be creative with attaching the brackets.  Also, since I didn't want to drill into the tile to attach the brackets to the wall, we had to "hang" the shelves with the brackets rather than have the shelves sitting on top of the brackets.  If I were doing it myself, I would have just screwed them in.  But, husband told me that the screws would eventually pull out.  We ended up drilling all the way through the wood and attaching the bracket with nuts and bolts.

We also have the shower finished.  We surrendered our DIY spirit (which had actually been crushed) and hired someone to tile the shower for us.  We can't use it yet because the grout is not cured.  We got a little ahead of ourselves and each gleefully took a shower on the third day after it was done.  But, it was so warm and humid those days that the caulk around the edge hadn't cured and it began to wash away.  lol.  So, how were we supposed to know that?  Well, if we had read the instructions, we would have known that it takes 3-5 days depending on humidity and temperature.

So, I reapplied the caulk and now we have to wait again.

Click on this link to see the Final Reveal.