Welcome to Legal Tender Farm

Welcome to Legal Tender Farm

Saturday, December 27, 2014

The Polar Express

Our Christmas gift to Liam this year was a ride on the Polar Express.  It departs from Palestine, Texas and goes to the North Pole *wink, wink*.  We had read the reviews ahead of time and were a little nervous about it.  They ranged from "the greatest thing ever and we'll do it again every year" to "the worst, stupidest thing ever and will never do it again".  It's expensive and non-refundable, so quite a risky commitment.  But, the theme throughout the reviews, which are, of course, written by adults, said that the kids loved it even if the parents thought it was horrible.  So, I figured even if the rest of it was hokey, it would at least be fun for Liam to take a train ride since he's so into Thomas the Tank Engine.  And, I was so right.  He loved every bit of it.

I wanted to write a review for those who might be looking for something fun to do with their children or grandchildren and are wondering what this ride is all about.

I booked our tickets for the day after Christmas on-line at EastTexasPolarExpressRide.com about six weeks in advance because it sells out early.  There are three classes.  I bought "Standard Class" which was the cheapest.  Some of the more expensive options include double decker cars, heated cars, and cars with tables.  I didn't figure we needed any of those.  The weather turned out to be very mild, but we brought blankets and coats just in case it got cold.  We didn't need them, but if the forecast is for cold weather, be sure to bundle up. To have something to give to Liam as his gift, I found some printable tickets on this website and had Tom print them out on card stock.


I cut out three of them.  Liam's parents had primed him by reading to him The Polar Express, so he knew what the tickets looked like and he was very excited about it.  We were nervous that it would be a let down after all the excitement.  

The information on the website encourages the wearing of pajamas.  "Pops" thought he'd get away with not wearing any because he didn't have any decent ones to wear, but I took care of that by secretly buying him some as a Christmas gift.  It took some persuading, but he was a good sport and we all donned our pajamas for the trip.  I hated to laugh, but it was pretty hilarious to see Tom walking around in public with these brightly colored pajamas on.

He almost chickened out when we got there and he didn't immediately see other men in pajamas.  The man parked next to us was wearing pajamas bottoms, which stopped Tom from immediately ripping his off and just wearing his jeans.  When we arrived at the depot, which was quite a long walk from where we parked, we saw that there were many adults, men included, with various parts of pajamas on.  There were some families all dressed in the same pajamas - kids, parents, and grandkids, so we were, by far, not the only ones.  I would encourage everyone to enter into the whole spirit of the experience and wear their PJs.  

We had to wait in a line to pick up our tickets.  It was quite a long wait and there was no shelter, so I was glad it wasn't raining.

Tom wore our Go-Pro on his head, which, in hindsight, was a mistake because the video is very jerky and mostly aimed above our heads and the lighting is dim.  But, he did get the important bits filmed and you can see what the ride is like...sort of.

Here's the train depot before it got very crowded.


It was very exciting for the kids to watch the train arrive.


After boarding, the conductor comes down the aisle and punches the the children's "golden ticket", which they receive at the ticket booth when we check in.  There is plenty of warning on the website to allow enough time to park, get your ticket and whatever else you want to do before time to board.  So, please don't arrive late like these people did.  Getting the ticket punched is exciting for the kids and having late-comers herding down the aisle kind of messed with our experience.


After about 20-30 minutes of train-riding, drinking hot chocolate, eating cookies, listening to Liam Neesom reading The Polar Express, and singing, we arrived at the "North Pole".  Santa and his elves were visible from the train and were waving at us.  The lights were dimmed in the car so that we could see outside better.


We stopped briefly just past the North Pole so that the train could reverse.  Apparently, we picked up Santa.


On the way back to the depot, the chefs and waitstaff danced with the kids in the aisles.  Liam loved it and really wanted to dance, but he had also heard that Santa was on the train and was very intent upon watching the door to see him enter.


Santa took time to speak with each child individually and gave them each a bell from his sleigh.  Finally, it was Liam's turn.  He was thrilled when Santa told him, "I'll see you next Christmas!"


The rest of the trip, the children paraded up and down the aisle ringing their bells and singing Christmas carols.  We all waved to the people waiting on the platform as we arrived back at the station.  Even disembarking was fun for the kids because the chef stood at the door helping us navigate the steep steps and bidding us farewell.

Some of the reviewers on the website complained that the cookie was some horrible packaged sugar cookie.  We took our own cookies because Liam and I eat gluten free, so we asked our chef to give our share of cookies to the children across the aisle from us.  From what we saw, the cookies looked pretty good.  They were not packaged, but were chocolate chip and on a platter.

We saw port-a-potties lined up outside the depot, which we weren't thrilled about, but when we got inside, we found that there were restrooms inside the depot as well.  When we first went in, there was a line out the door, but after a while, everyone cleared out and there was no wait for the restroom.  I don't know if there were any restrooms on the train cars.  I didn't see them if there were, so it's a good idea to go before if there's any question of needing that facility.

They have daytime rides, too, and I can see an advantage to being able to look out the windows and see the passing countryside.  But, I opted for the night time ride so that we could see the lights and I suspected that the North Pole would look a little less magical during the day time.

Although, it seems that they could make a better effort at making the North Pole a little more North Pole-ish, a little more magical, I really have no complaints about this event and I would recommend it for anyone with children.  We thought it was great and were so happy that Liam enjoyed it so much.


Wednesday, December 24, 2014

Successful Trapification and Disposalization


Tom bought a trap and set it up carefully in the barn to catch the skunk that we suspected had taken up residence.  We think it was enjoying the cat's food during the night and cozying up between the barn walls during the day.  So, he baited it with cat food and locked Alice the cat away so she wouldn't spring the trap.

He put a rope on the latch mechanism so that he could open the cage from a distance, and also a rope attached to a broom so he could drag the cage out of the barn if it contained the skunk.  The plan was for him to throw a towel over the top to keep the skunk from spraying, put the cage in the truck, take it to a remote place, then pull the string to open the cage.

Unfortunately, during the night, the skunk pulled all of the rope into the cage and entangled itself.  Tom was able to pull the larger rope, because it was attached to the broom, and drag the cage out of the barn, but he couldn't pull the other one out because it was so tangled with the skunk's feet.  There was no way to open the cage without getting sprayed.

I took on the role of defense attorney and tried to save it's life.  After all, it is a beautiful creature and why does it have to die just because it chose the wrong place to reside?  In the end, though, there was no way to safely free it, so Tom disposed of it...I didn't ask how.

Saturday, December 20, 2014

Farewell to Evil

Finally sold Evil the Kiko nanny goat.  Actually, I sold both the Kiko nannies.  I was so tired of not being able to go amongst the goats without having to constantly keep my eye on this one.

I told the man who bought them that he had to transport them in something with a top on it, so to come prepared because I won't let them leave the property in an unsafe vehicle.  He told me he had a goat cage for the back of his pickup.  Well, I don't know what happened, but he just showed up with a pick-up truck that had a hard top on the bed.  He ended up tying them both up by the legs and rigging a halter for the heads, tying that to the side of the truck.  He laid them on their sides in the bed of the truck and put the top down.  

If it was any other goat and if I wasn't so glad to see her gone, I never would have allowed my goats to be transported that way.  I hope they have a good home, but mine is so much better with her in particular, gone.

See how nicely all the other goats are lined up, each eating from their own dish.  It was a rare occurrence with Evil running amok from dish to dish shoving everyone else out of the way and me running from dish to dish trying to fill them before she got to me.

I am so relieved.  And I bet the rest of the goats are, too.

Varmint

This is what I opened the barn door to this morning.  There must be a varmint in the barn, probably a skunk because there is lingering skunk smell.  I know it wasn't the dogs because the barn door was shut all the way and the cat doesn't dig like this.


It's quite a hole.  
We haven't found the varmint yet, but I must admit, we haven't looked very hard because we don't want to come upon it suddenly and get sprayed.  I left the door open a little tonight in hopes that it will leave on it's own.  I think it was trying to dig it's way out.

Thursday, December 04, 2014

Pinecones Galore

We have loads of pinecones on our property.  The squirrels eat a lot of them, but so many are left on the ground, which is a problem when it's time to start mowing again in the spring.  They shoot out like bullets from under the mower.

So, I stole this awesome idea from someone on pinterest.

I gathered them all up and put them in the entryway flowerbed as mulch.  It's freshened up the bed quite a lot.
I even went and gathered up the neighbor's pinecones, for which he was grateful.  It takes way more pinecones than you'd think to cover this area.


Saturday, November 22, 2014

Piglette Is Growing

Well, Piglette is growing, but not as fast as I thought she would.  I did a bit of searching on what to feed growing pigs.  Seems, like everything else, everyone has their own opinion on what is best for pigs.  I came across this blog and really identified with the author.  I like her attitude and the way she approached the pig raising.  I figured that feral pigs do just fine on their own without any help from us or special feed, so how could I go wrong?

I settled on a mix of commercial pelleted hog food, cracked corn, and a bit of calf manna.  I had Tom put an automatic feeder in her pen and I keep that filled so she can eat as much as she wants of it.  Each day I give her our leftovers and I boil up a dozen or so eggs and give her one or two a day.

Piglette is playful.  I've seen her out playing with a branch that has fallen into her pasture and she pushes her buckets all around.  She seems to like to hang with the other farm animals when she can.  Sometimes the goats, donkeys, and Pony will go into the alley next to her pen and she will always go running to them and stays as long as they do.  She runs around chasing the guineas when they go into her pen, which is nearly every day, and she likes to play with me when I go to feed her, but I don't indulge her much because...well, I don't need a broken heart when it's time to butcher her.

She loves the boiled eggs.

Thursday, November 06, 2014

Kitchen Reno XII, Finished Concrete Countertop

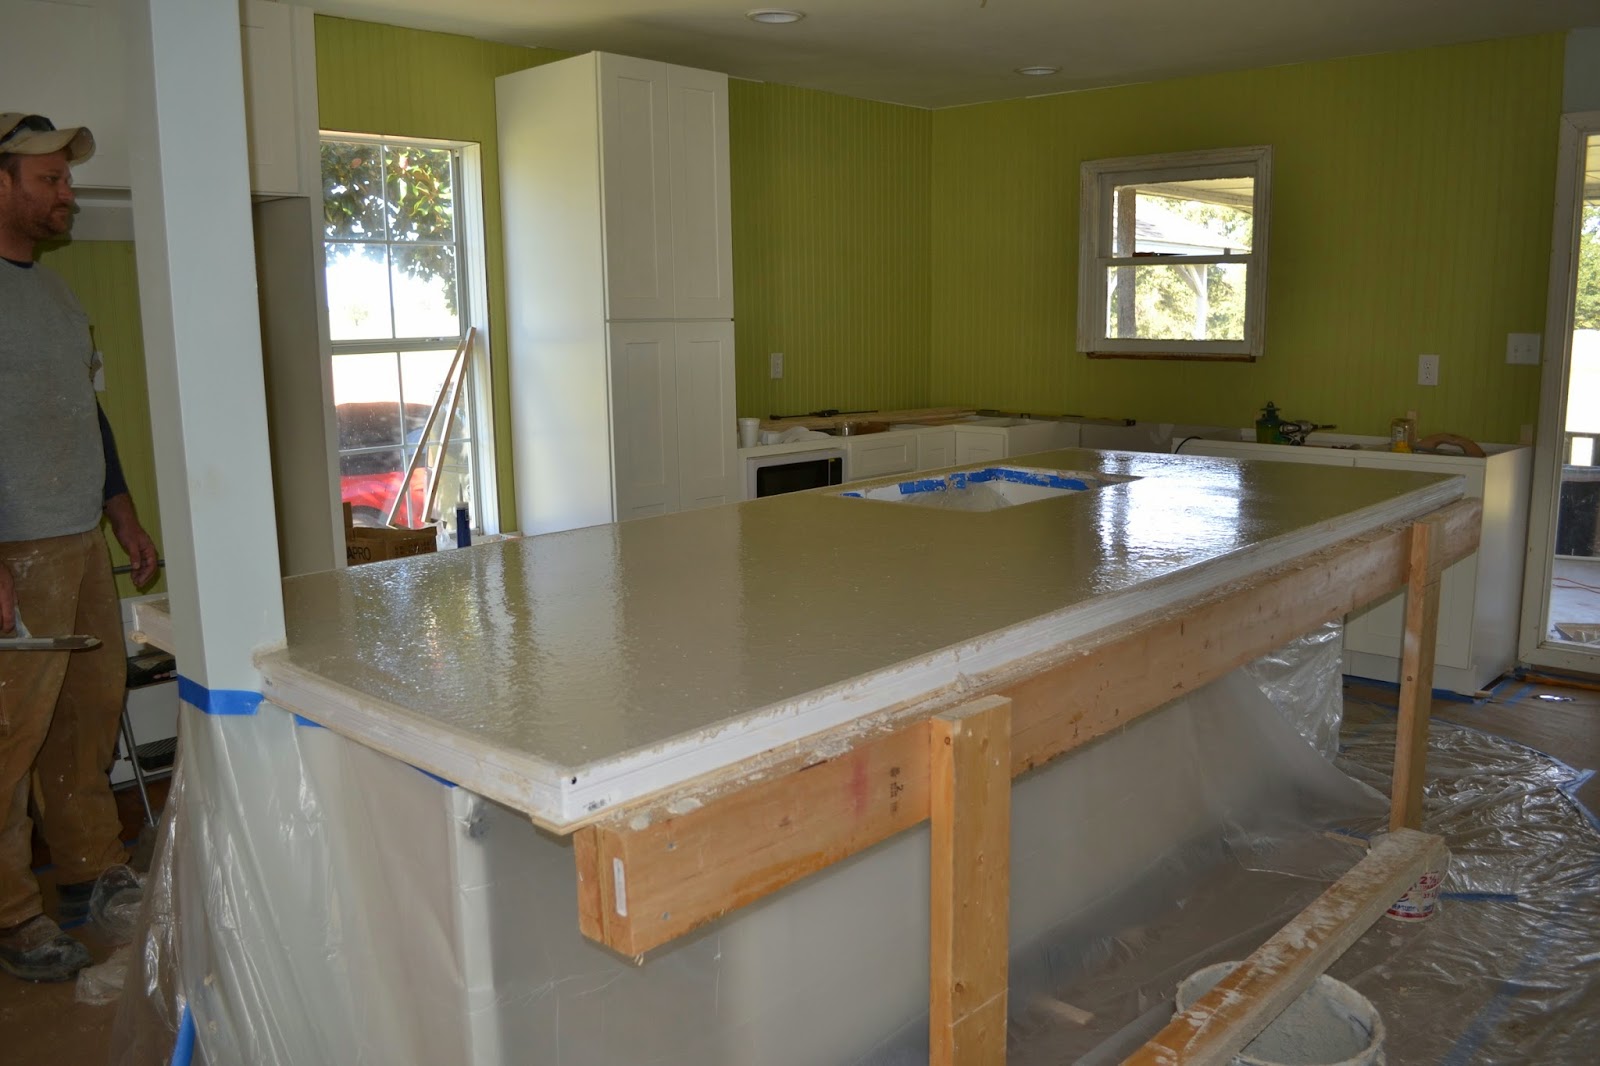
We finished our concrete countertop.  I think it's pretty great for two rank amateurs.  Internet wisdom told us that it's not a good idea to do a cast in place countertop if one has no experience with concrete.  We took the risk and it was worth it...not perfect, but still great.

We loosely followed the instructions of the smiling Buddy Rhodes, who is apparently the concrete countertop guru of the internet.  I say "loosely followed" because we did not use his concrete material.  His mix is different than the Quikrete product we used and Buddy's mix was waaaay drier than ours.  Ours was a little too wet, but it doesn't seem to have made much of a difference in the finished product.  If you want to do one of your own, I recommend watching all of Buddy's tutorials.


The countertop would have been just as great if I'd not marbled it, and I was torn about the decision, so I polled some friends and family.  The feedback I got was about 50/50 for and against the marbling.  In the end, I decided to do it just because I wanted to.  To the homeowner who may be reading this, this is the price of having me redesign your kitchen.  Faux finishing is fun and sometimes I need to do something just for fun.

If you want to try something like this, here's how I did it.  After the concrete was dry (in our case, three days after we poured), and after we sanded it very lightly, but before the sealer was applied (because, obviously, if you put a sealer on, it will repel stains rather than accept them), I used a concrete stain called SmartColor , in black, and I painted it on with a feather.  Yes, a feather is way better than a paint brush for this application.  SmartColor is a water based stain that comes in a four ounce bottle.  It's pretty thick and dark, so I diluted it with water so that I could get varying shades of gray.  After I saw what color the countertops were going to turn out to be - more of a tan than a gray - I had a little buyer's remorse and wished I had gotten a brown for the marbling.  But, I didn't want to wait (typical), so I made do with the black.

Concrete does not accept stain evenly.  I learned that when I acid stained our barn apartment floor.  That's why concrete looks so natural and stone-like when you stain it and it's beautiful that way.  But, that worked against me somewhat on the marbling.  So, be prepared for the concrete to sometimes do it's own thing while you're applying your stain.  I think our slab was particularly cantankerous because we didn't know what we were doing and our surface, although very smooth, was not uniformly sanded, or...something.  I think it had something to do with some spots have more sand on the surface and some spots having more "cream" (watch Buddy Rhodes if you want to know about concrete cream).

And, that is what contributed to our main issue...


So, when I say "not perfect", the issue is this...the concrete does not have an even sheen.

Since I wanted a food safe finish, I chose to use Buddy Rhodes' sealer and beeswax finish.  I put two coats of sealant, which was a liquid that I just sprayed on and then wiped up the excess.  It's very easy to apply and it protects the concrete from stains, but it has no sheen.  After it dries, you can't tell anything is on it.  He has another sealer, to be applied over the first one, that is supposed to give the concrete a satin sheen.  I didn't buy that one mainly because it is expensive and I didn't see a need for it.  Instead, I went with the wax.  It's like a puck of wax that you just rub over the surface, then buff.  

As you can see in the above picture where the light is reflecting, the concrete looks spotty, and that is because some areas shined up nicely and some remained dull.  I think a couple of more coats of wax will make it uniformly shiny, but that will have to be a project for another day because the most important thing is to get this kitchen finished and functional.

So, it's done!  Except for a couple of small items, I've done all I can do and the rest is up to Nephew.  All that remains is the trim work, installing the sink and dishwasher and electricity in the island.  It could all be done by this weekend.  Or not.

If you want to follow along with the whole kitchen remodel, go far, far back in time to here.

Oh, and as a post script, I did add extra fine glitter (a clear glitter and a silver glitter) to the wet cement.  You can see it in person, but not in the pictures.  I thought it might be sanded off in the final sanding, but we got enough down in the cement so that the sanding revealed the glitter underneath the surface. 


Tuesday, November 04, 2014

Kitchen Reno XI, Building Forms

When I was contemplating putting concrete countertops in the kitchen and casting them in place (in the kitchen, right on the cabinets), one of the things that had me stumped was...how does one cover up whatever is going to be used as a base for the form?  So, just in case someone else has that same question, I thought I'd explain what we did.

First of all, there are some very good reasons for not casting the concrete in place and many people prefer to pour them in a form outside or in the garage or on the porch.  If you pour them somewhere besides on top of your cabinets, you cast them upside-down. That means you can use a sheet of melamine on the bottom and the sides so that when you take them out of the forms and turn them over, you have a smooth-as-glass countertop.  You don't have to worry about smoothing the bottom of the slab, which won't show after it's installed, so you just pour, screed, and leave it to cure.  It also cuts down on the amount of sanding or slurrying.  And, pouring and finishing concrete is messy.  It's great if you can keep the mess out of the house.

But, if you do it that way, you have to plan your project backwards and upside down.  That's fine if you have just a simple slab with no cutouts, but we had to notch ours on one end to fit against a column and we also had a sink cutout.  And, the biggie...somehow, you've got to get that big ol' slab of concrete back in the house.  Our slab is 10 feet by 4 feet and weighs approximately 800 pounds.  We couldn't very well carry it into the house with a tractor.  According to other tutorials I've seen and read, many people make two or more slabs, then bring them in and put them side by side, but that means there are seams in the countertop.  I wanted one continuous expanse of concrete with no seams.

One more benefit to casting in place is that you end up using less concrete because the bottom of the form becomes part of the thickness.

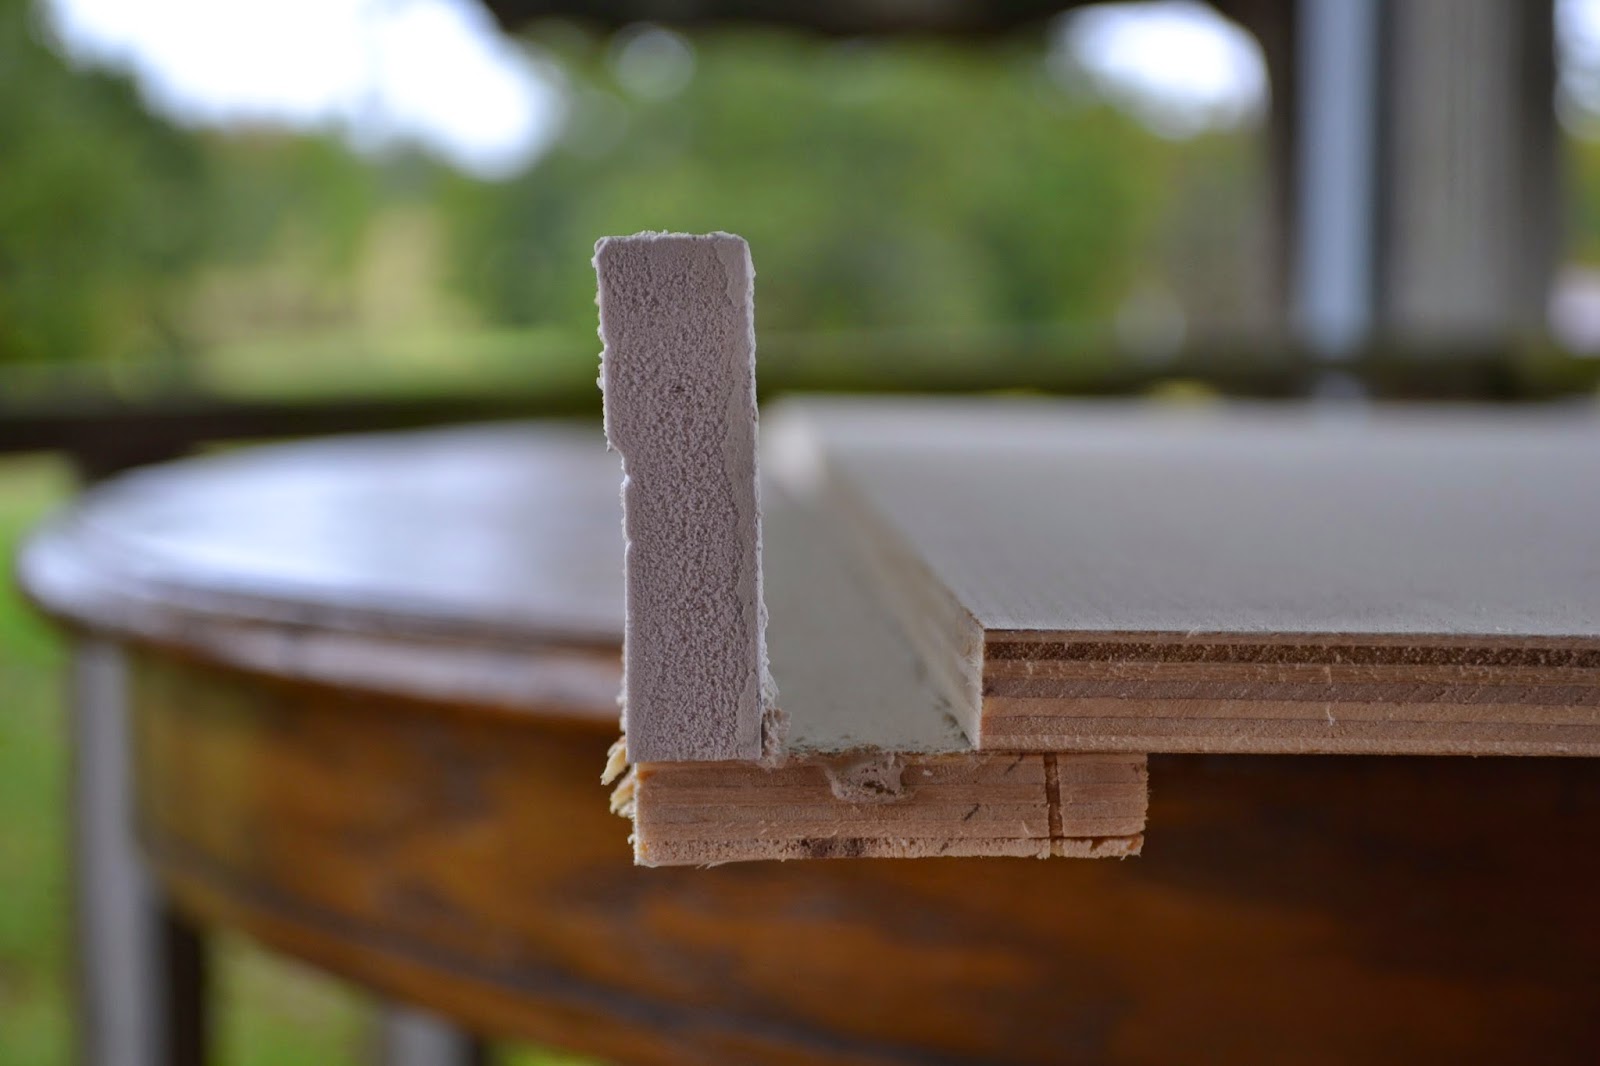
So, when you cast in place, the bottom of the form, whether you use plywood or concrete board, becomes a permanent part of your countertop.  If you build your form in a simple box style like you would if you were casting it upside down, then when you take the sides of the form off, you would have a 1/2 inch or 3/4 inch strip of plywood (or concrete board showing).  Unsightly!

It takes a bit of forethought to build the forms for cast in place so that the base of the form doesn't show.

Our countertop looks like a two inch thick slab, but we actually only poured the concrete one and half inches thick.  The only part of the concrete that is two inches is the lip around the edge that hides the plywood.

Can you see that line that goes through the middle of the concrete edge in the above picture?  That is there because of the way we poured the concrete.  I don't know why it happens that way, but it came out that way consistently in all of our tests because we poured half the concrete, then laid the rebar on top of that, then poured the rest of the concrete in.  Quikrete instructions say to fill your form starting at one end and working your way towards the other end, filling it to the top.  This is probably why.  But if you do it that way, you'll have to put your reinforcement mesh or rebar in the form before you start pouring, which means you'll have to put some effort into suspending it so it won't just lay on the bottom.  That line doesn't bother me at all, but for those who want to avoid that, this is me telling you how you can.

So, here's a cutaway of the form.  We used 1/2 plywood as the base.  As a side note, 3/4 inch is stronger and we had a bit of a problem with the 1/2 inch flexing because of our overhang.  See how we dealt with that problem here.  To achieve a standard 1 1/2 inch countertop overhang or lip, the plywood base needs to overhang the cabinets by a half an inch to have room to screw a two inch strip of plywood to the underside.  And, since we were pouring a 1 1/2 inch thick slab, the outer strip (that is standing on it's end) needed to be two inches wide.  It is widely recommended that melamine be used for the strips along the side, but we used a PVC product because it could be bought in strips long enough so that we didn't have to have a seam along the 10 foot edge.  This product does have it's downside, though.  It is not as strong as a melamine coated plywood and we had to be careful that it did not flex.

Here it is from a different angle.  The concrete pours into that channel all around the edges and creates a lip that hides the plywood underneath, so that when the forms (the two narrow strips) are taken off after the concrete hardens, all you see is a concrete edge.  If you look at it from underneath, you'll see 1/2 inch of plywood and an inch of concrete.

The PVC product is some kind of trim.  You want to make sure you put the smooth side in or else you'll have those ridges in your finished countertop edge, which is not particularly attractive.

Caulking the corners of the forms fairly thickly will give this nice rounded corner. 

Monday, November 03, 2014

Kitchen Reno X, Concrete Countertop

We finally, finally poured the kitchen countertop on Saturday.

Nephew built frames using 1/2 inch plywood as a base and some sort of coated wood.  It's not melamine, which every tutorial I saw suggested, but it has a very smooth surface and will hopefully release without sticking to the concrete.

He also welded rebar to strengthen the countertop.  I've watched and read several tutorials and, although there needs to be some reinforcement, rebar is not necessary for countertops. Most of the tutorials used a mesh like chicken wire.  But, since we are having a twelve inch overhang with nothing to support it from underneath, we needed some extra strength on that side.  This is a bit of an overkill, but if the homeowners don't like the countertop, they can always take it off and park the tractor on it.

We put a frame up under the overhang to keep it level until the concrete hardens.

I totally forgot to take pictures from here until the end.  I was going to strap my GoPro camera to my forehead and do a video tutorial, but the camera wouldn't work.  NOTE:  The GoPro is a nifty little gadget and I know there are lots and lots of GoPro videos out there, but I have found it to not be user friendly and I've been having a problem with mine not recognizing the SD card in it, so it won't work.

Here it is after the pour and after we screed it twice.  Screeding is taking a straight edged board, like a two by four and resting it on the forms, having it span the whole width.  Move the board with a sawing motion all the way down the length.  It pushes all the extra concrete off and levels and smoothes the surface.  Our concrete was too wet, but I think it's going to be OK.  We screed it two or three times,  let it set for a couple of hours, then came back and screed it two or three more times until there was no more excess concrete coming off.

I vibrated the form by running the orbital sander around the edges of the forms and the places where I could reach up under the countertop.  We had lots of bubbles.

After this, I went home and left Nephew to do the rest.  After it set up so that it could be pressed without leaving much of a mark, he troweled it, then waited and troweled again.  All told, I think he did it about six times and got a nice smooth surface.  Troweling it like that pushes out the air bubbles and helps the concrete "cream" to rise to the top.  At least, that's what the concrete guru, Buddy Rhodes, says.


Tuesday, October 28, 2014

Kitchen Reno IX, Visible Progress

We have finally reached the point where our progress in the kitchen is visible and satisfying.

All of the cabinets are installed, shimmed and leveled.  It took a lot of shims because the floors in this old house are pretty wacky.  All of the beadboard is painted and installed, too.  There's quite a bit of trim work that still has to be done, but at least we're seeing a kitchen instead of a big empty space.

After the plumbing is done (hopefully by tomorrow), we can start on the island concrete countertop.  While that is curing, we can finish up all the trim stuff that needs to be done.

It's exciting to see it all coming together!

Friday, October 24, 2014

Kitchen Reno VIII, Countertop Update

We've taken the forms off of our second test slab and it's much better.  To see the detail, you'll have to double click on images.

The edges with the melamine are very smooth.  I wish we could get our top that smooth without sanding it.  There are air bubbles which make pock marks.  I don't have a problem with that because I like the irregularity of concrete.  But, if we decide it will look even better without the pock marks, we can use a slurry method to fill them.

The "white" concrete mix is not what I expected.  It's not possible to achieve a true white because of the sand necessary to make the concrete mix, so I wasn't expecting white.  I was actually expecting just a lighter shade of the normal concrete gray color.  Instead, it is more of a creamy color and a lot of the sand in the mix shows with just a light hand sanding.  I'm sure it will still look great, but it throws the vision I had in my mind off just a little.

The veining is still there, but it is very light.  The feather made grooves in the cement that we don't want.  I'll try another method of painting on the marbling after we've properly sanded the concrete.  Unfortunately, it has been very difficult to find the sanding/polishing pads that we need.  We'll probably have to order them off the internet and maybe even buy a new sander.  We did not "tent" our slab with plastic to cure as was recommended by all tutorials.  I don't know if that has hurt our finished product, but we will be tenting the kitchen concrete as directed.

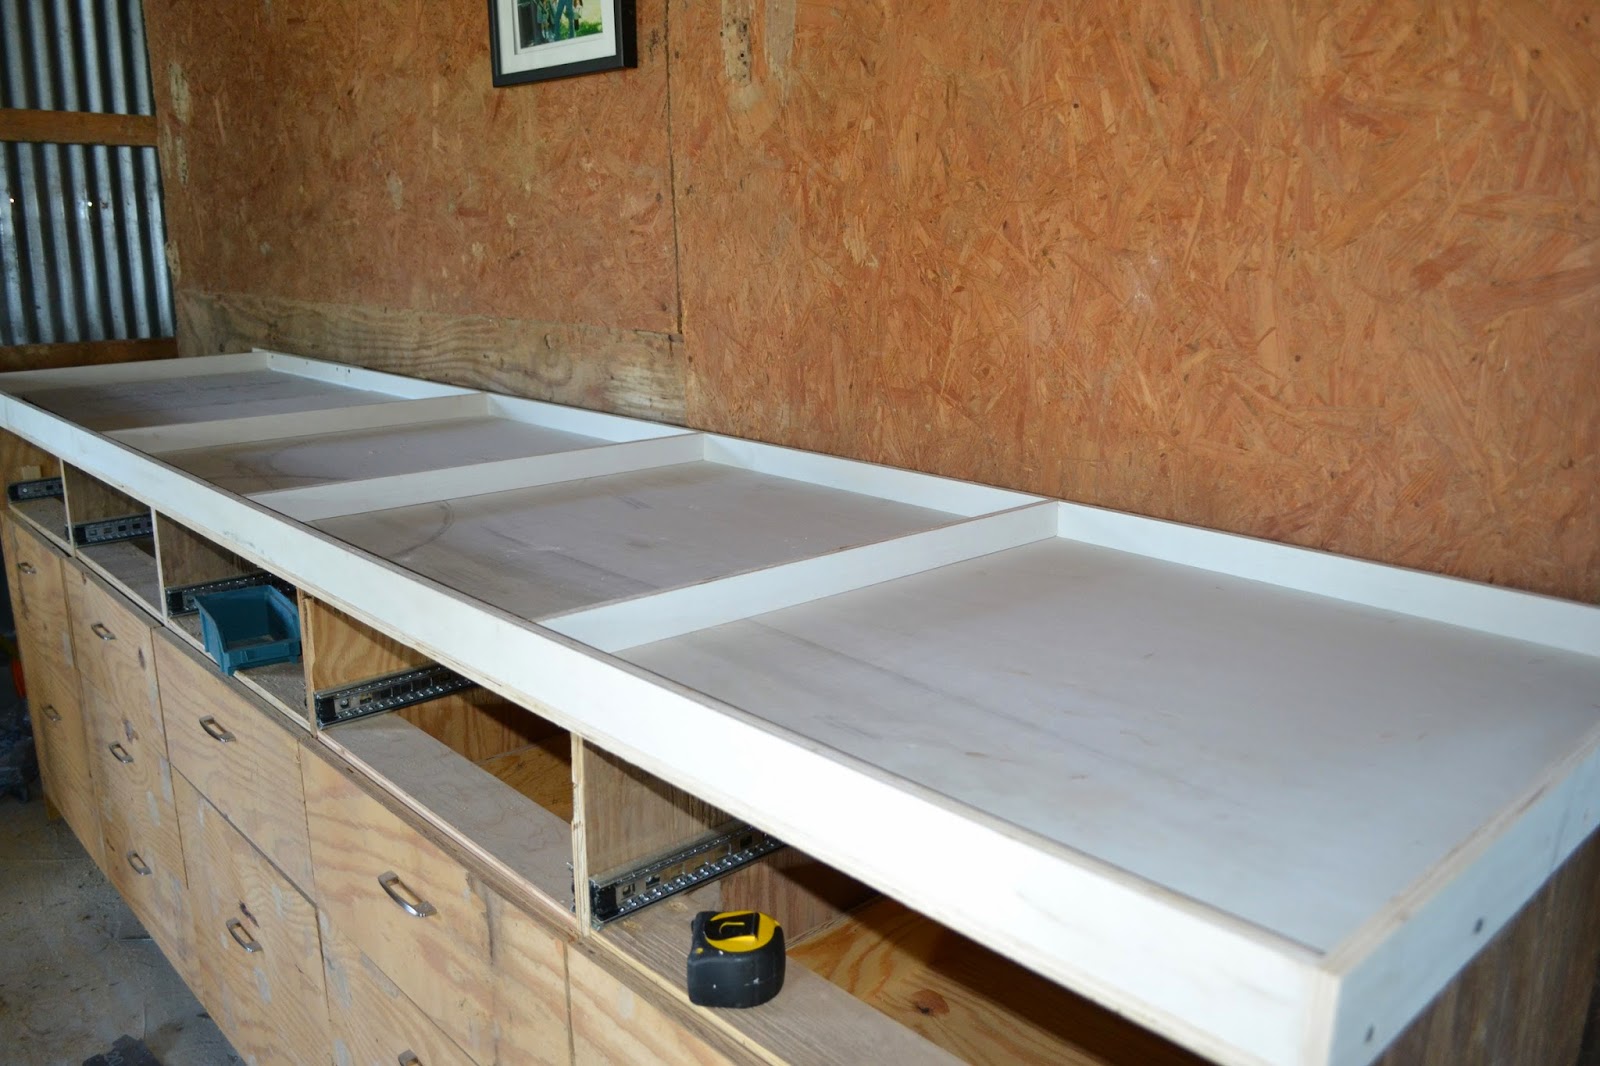
This is the set of cabinets in the barn that we've been working with.  There's another set just like them to the left of this one.  We'll eventually put a countertop on those, but right now we have to concentrate on getting the cabinets in the kitchen so that we can create the countertop in there.

We're getting close.  Nephew has been installing cabinets today.
Yay!  I'm so excited!


Thursday, October 23, 2014

Kitchen Reno VII, More Test Countertops

Since our first test concrete countertop was such a disaster, we poured another test pad today.  Nephew and I took deep cleansing breaths and told each other, "Today, we are not going to panic.  We're going to take our time and follow the plan."  With confidence, we set up our equipment and started mixing the concrete...water first.  It went much more smoothly and we made our Quikrete mix a little wetter for easier pouring and in hopes that we wouldn't have the rough edge this time around.

I manually pressed down all of the concrete before and after the rebar was installed.  Nephew carefully screed the surface to make it level, then troweled it to make it smooth.

One of the things that we forgot to do in our rush the day before was to vibrate the forms after the concrete was poured.  Vibrating the forms makes the air bubbles rise to the top.  In the tutorials that I read and watched, they all suggested running an orbital sander along the sides of the form.  Because we were so calm, cool, and collected, we remembered this step.

I wasn't convinced that just running it along the edge would be enough, so I also vibrated the bottom of the form.  It does work.  We could see the bubbles rising to the surface and popping.


This is our first test slab, dried.  Eek!

And this is our second test slab, still wet.

I sprinkled my three colors of extra fine glitter on the surface.  Then did another marbling test.

I think it turned out pretty good.

I diluted the charcoal concrete tint with water and while the concrete was still quite wet, I painted it on with a chicken feather.

I don't know how far the tint will soak into the surface.  I expect it won't sink in far enough and when we sand it, the marbling will be sanded off.  But, I have a back-up plan that I will try after the sanding.  I also have a feeling that the glitter will sand off, but when we pour our kitchen slab, I will add the glitter to the cement as we're pouring it.  That way, it will be mixed in and will be deeper than just the surface.

Kitchen Reno VI, First Test Pour

After we put the cement mixer together, we were ready to mix the concrete.

The first thing we learned was (1) put the water into the mixer FIRST.  Then add the concrete in batches, letting each one mix thoroughly before adding the next batch.  We're using Quikrete Countertop Mix in white.  All we have to do is add water (no sand or rocks or additives), which is great, but still, Nephew wouldn't have to be aiding the mixer with a shovel if we had done it right.  Also, you can avoid panic and urgent cries of, "Add water! Add water!"

It's just all around better to do it that way.

Cement dust is bad for you.  Don't breathe it.  It puffs up out of the mixer while you add it.

Here's the first pour.  We thought it was a pretty good consistency.  The instructions say to add one gallon of water per 80 pound bag of concrete mix.  It actually took more than that to get it pourable.

After the first pour, we were too panicked and horrified to take pictures.  Even if I had thought about it, I had wet cement coated gloves on and couldn't pick up my camera.  So, you'll just have to imagine what it might have looked like.  

We poured a thin layer, then laid rebar on that, then poured more over it.  I patted it down and pushed it into the corners and the little channel across the front and sides that will form the lip of the countertop. 

OK, so I thought I might be able to make the concrete look like carrera marble.  My thought was that I could sprinkle extra fine glitter onto the surface and then kind of trowel it in.  Then I could use the liquid concrete tint sort of as a paint.  I bought charcoal because when I paint with grey or black, I can get all kinds of shades of grey.  My reasoning was that I was painting on a white background and that the tint would just kind of ooze into the surface and when it was troweled, it would streak and look like marble veining.

I was so, so wrong.

The tint was so strong and I used waaay too much of it.  I wish I had pictures of our horrified faces as Nephew troweled over it and it turned into big ugly black streaks.  I ran for a rag to press on the surface to soak up as much of the tint as I could, but it was too late.

Behold....ugly.

OK, so we know what not to do.

As part of our test process, we had to test which material would be best for the form edges.  The prevailing wisdom is to use melamine for the best results.  It's supposed to produce a smoother surface and release easier when it's time to take the forms off.  For this side, we used plywood.

As you can see, it's not so good.  It's all bumpy.  Not good for a kitchen island.  We determined that on our next test we will (1) use a little more water to make the mix flow a little better, (2) manually and with a trowel press each layer of concrete down really good.  In the picture, you can see that there is a nice smooth edge at the bottom of the slab.  That's the layer that we poured, troweled, then laid the rebar on.  We didn't really press down that much on the top layer, I guess. And, (3) vibrate the countertop to shake the air bubbles out.  We had planned to do that on this one, but were so freaked out that we completely forgot until it was all over with.  


Wednesday, October 22, 2014

Kitchen Reno V - Concrete Countertops

Nephew and I decided on concrete countertops for the kitchen, but neither of us has ever done it before.  He came up with the great idea to practice on the cabinets he built in the barn.  He needed countertops and was going to make them out of plywood, but concrete is even better, and...we do need to practice.  So, concrete countertops in the barn, here we come!

Here are the forms that Nephew built.  He divided this one slab into four sections.  We planned it all out and were going to try a different technique on each section.  We didn't actually follow through on said plan, though, because when we started mixing the concrete, panic ensued and most of our meticulous (or slap dash, as the case may be) planning flew out the barn door.

As an aside, I really am, at heart, a slacker.  I didn't want to practice.  I just wanted to jump right in and pour beautiful concrete right in the middle of the kitchen.  But, I was persuaded by Nephew's logic.  And, I gotta tell ya', it's a good thing.

I've watched the tutorials and have seen that we must caulk the edges with silicone.  So, I diligently caulked.  I love the straight lines.  Don't you?

OK, so I'm pretty sure this was NOT MY JOB.

My job is designer of fun stuff, not builder of equipment.

Tom had bought a little cement mixer to do another project later this year, which he graciously allowed us to use for our own project.  It came in a box and needed assembly.  Well, I thought assembly meant taking it out of the box, putting the drum on the stand and filling it with concrete.

Uh, no.

It was all in pieces.  The above picture shows it half assembled.  And, for some reason, we were doing this in the blazing hot sun.  And no breeze.

The instructions were ridiculous.  It took both of us, with our brains, to decipher these pages.  Yes, it was in English, but not for normal people.

We finally got it together with minimal taking it back apart and reassembling.

Let the concrete pouring begin!

Tuesday, October 21, 2014

Kitchen Reno IV, Finished Floors

The floors are finished!

So lovely.


I laid down construction paper to protect the floors from our tromping in and out.  I left the bare places in the areas where the cabinets will go since we don't want to install cabinets on top of the paper.  I hated to cover them up, but it will be worth it to keep them unmarred during the construction.

Wednesday, October 15, 2014

Kitchen Reno III - Making Things Beautiful

Nephew sanded the floor.
(I should have just painted the rest of that brown living room.)

We had a friend recommend using a product called JimSeal on the wood floor.  On Sunday, I halfway listened to Nephew and Tom talk about it and didn't really give it much thought, assuming Nephew had the same vision for the wood floor as I did.  I awoke on Monday morning to the thought, "JimSeal...GymSeal...GYMseal!?  Oh no, that's a product to seal gymnasium floors!  The floor is going to look like a gymnasium!?"  What a horrible thought.  I could hardly wait for Nephew to wake up so I could text him, "NO GYMSEAL! NO GLOSSY FLOORS!"

Thankfully, he had not sealed the floor yet.  That's the first time I was grateful that something HADN'T been done yet.  Turns out he wasn't using that product anyway, but just to be safe, he returned the semi-gloss product and got a satin.  Phew!

Now, I can relax.
For a moment.
Deadline is looming.


Friday, October 10, 2014

Late Season Produce

I thought my garden was done, but the eggplant got a second wind.  I hadn't even looked at my green bean vines in weeks.  Today, while picking the peppers (which always produce until they freeze), I looked at my beans and they were loaded.


 I picked until my sack was full and this is what I got.  There's probably this much more left on the vine.  I thought they might be old and tough because some of them are pretty big and fat, but I cooked some for dinner tonight and they were tender and tasty.

I guess I'll be preserving some beans.

Wednesday, October 08, 2014

Kitchen Reno II

We've almost attained clean slate status on the kitchen.  Nephew plans to refinish the wood floor this week.  After that, the actual install can begin.  We're on a deadline now.  Well, we don't actually have a date, but we need to have it ready before Thanksgiving.  There's a lot to do.

Here's where we are...

There was a narrow wall to the left of the door, which we removed so that we could extend the cabinets all the way to the side light next to the door.  The light switch and power outlet were in the wall, so they had to be moved to the outer wall.  A couple of outlets had to be repositioned on the other kitchen wall, as well as new wiring for new lighting.  My electrical engineer husband helped with the wiring for lights and power.  


Since the sink is in the island, that's where the water line runs.  The refrigerator will go to the left of the window, so Nephew put a box and water line hookup for the ice maker there.  The water line for that runs under the floor to the island.

After I scraped the ceiling, Nephew smoothed it out and lightly retextured it, then I painted it.  It's so nice to see a clean fresh coat of paint.  The old kitchen had only one light fixture in the middle of the room.  Now it has three can lights.  There will be two pendant lights above the island.  The light boxes and wiring are ready for those. 

The new supports are freshly sheet rocked and primed.  As it usually goes with renovations, one thing leads to another.  I had no intention of extending my efforts beyond the kitchen and dining area, but when the beams were torn out, the corner of that far wall (the white one) had to be torn up.  There was a built in book case there that had to be taken out and there was a hole in the sheetrock behind that.  Nephew had to patch it all and I couldn't just leave big unpainted patches, so while priming the dining room wall, I just continued on into the living area since I had enough primer.

The green and blue patches scattered about are the colors I'm testing out.  They actually look darker in the pictures than they do in real life.


Look here for before pictures .

Tuesday, September 30, 2014

Cottage Kitchen Reno

I've been asked to collaborate with Nephew to renovate the kitchen in a little old farmhouse.  I ordered the cabinets a couple of months ago and we finally began the actual work a few weeks ago.  It's been keeping me busy, but we've reached the slower time of year for our farm, so it's a good project to be working on now.

As best I can tell, this house was originally built in the 30's or 40's.  We were told that it was moved to it's current location in the 60's.  Either then or at a later date, someone did some DIY remodel.  They opened up the kitchen to the dining and living room, moved some walls, added a bath and who knows what else.

This is the kitchen before Nephew started the demolition.

This is the view from the living room.  Clearly, a wall was removed where those beams are.  They look good and solid, but we were in for a nasty surprise when Nephew got into the demo.

I spent a day scraping the popcorn ceiling off.

Ugh.  I had ugly thoughts about the person who invented popcorn ceiling texture.

It became clear that the walls needed to be torn down to the studs.  There was no insulation, but the walls were surprisingly cool to the touch even on the west side with the afternoon sun beaming on them.  Two layers of insulation were installed - one by me and one by Nephew.  I felt it was overkill, but that's not my department, so I just did as I was told.  At least there won't be any problems with the kitchen being too hot or too cold.

This was one of the layers of wallpaper that we found.  I'm a little embarrassed to admit that I kind of like it.

All cabinets removed and part of the sheetrock is done.

So, the nasty secret...those beams that were holding up the ceiling?  They weren't resting on any supports under the floor.  And, the beam across the ceiling was not supporting any joist.  It was just two by fours resting on the floor and on top of that, no supporting beam.

So...

Tom and Nephew crawled under the house to put in some supports.

It was a dirty job.  Eek!  When I was little, I used to voluntarily play in the crawl space under our childhood home.  It would take some powerful motivation to get me under there now.

Nephew emerging from the depths.

And cutting blocks and beams for the supports.

After the floor was shored up, they turned their attention to the ceiling.

They made a crazy network of wooden supports on jack stands alongside the beam that was supposed to be supporting the ceiling.  They jacked up the ceiling far enough to lift the weight off of the original supports so that they could be removed.  

Here it is from a different angle.  In the middle is the new beam not yet supported by new columns.  The weight is being born on the supports on either side of the middle beam.

I didn't get pictures of the finished supports, but they are done and the area is now structurally sound. There's a lot more to be done, but it's exciting to look forward to the installation of the cabinets and having a beautiful new kitchen.

Disclaimer:  I do not pretend to know the proper terms for the the things in the attic or in the crawl space that structurally support a house.  I did the best I could with words like "joists and beams" to describe the situation.