Welcome to Legal Tender Farm

Welcome to Legal Tender Farm

Wednesday, November 29, 2017

Master Bath Renovation Part Six

To start at the beginning, go to Master Bath Renovation Part One.

We're still working on the bathroom and have made a lot of progress, but it's like two steps forward, one step back.

We were having major problems getting the crown molding cut so that it would fit together.  We pretty much gave up in despair on Monday.  Husband went to Lowes and bought a Kreg Crown Pro crown moulding jig tool.  He has a Kreg jig to make pocket hole joints which he uses all the time and was happy to see that they make a jig for crown moulding.  I'll let you know how it works...when we get to that.

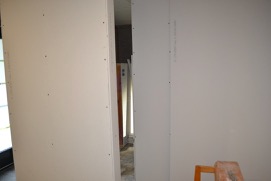
In the meantime, just this morning, Husband was installing the last row of shiplap plank right along the ceiling.  Each piece has to be ripped down to about a two inch strip and will cover the studs that you can see at the top in Part Five.  These will be covered by the crown moulding and we had planned not to put planks there at all, but it turned out that we need to to have something to nail the crown to.  Anyway,  I was vacuuming up the dust from sanding joint compound in our new closets.  He went down to the barn to get something and there was a skunk in there.  Harry Dog grabbed the skunk, which is unusual because he has learned to stay away from skunks.  Well, either he forgot, or he thought it was an imminent danger.  When he grabbed it, it sprayed and got all over the barn.

As this bit of excitement was going on, the power in the bathroom suddenly went off.  Husband called me from the barn to tell me about the skunk, then I told him about the power.  He thought he might have hit a wire with a nail.  So, he came back up to the house, reeking of skunk, and took a couple of planks off the wall.  Turns out, he did not hit a wire.  So, he is currently investigating the mystery cause of the power outage and I'm pretty much stalled on my closet work, because...no power.  My plan was to put the first coat of paint on today, but now, I don't know.

So, how about some fall color?


These pictures really are beautiful, but unfortunately, you can't really tell because Blogger.com doesn't seem to care that pictures aren't clear on their site.

I need to scout around for a place to move my blog.  I'm getting really tired of blurry pictures.

Go here to continue reading about my Master Bath Renovation Part Seven.

Tuesday, November 21, 2017

Master Bath Renovation Part Five

Click on link to start at the beginning, Master Bath Renovation Part One.

We're moving right along, but, whew, this is taking a long time.  I'm officially in Thanksgiving mode this week, cooking and cleaning and getting ready to host Thanksgiving dinner, so I haven't done much on the bathroom.

Husband worked on the shiplap.  We ran out right towards the end.  NOTE:  if you're installing shiplap, make sure you buy extra.  By my calculations, we needed 47 12 foot planks.  I bought 50 just to be safe.  But, it turns out that we needed 2-3 more planks.  I was bummed that our work got interrupted.

Also, if you're a rank amateur wood worker, like us, and have outside corners that have to be mitered...hire someone or, if you don't have a compound miter saw, get one.  We bought Ariata pine nickel gap planks from Home Depot.  Many of them were warped and/or had a slight crown in them, when they should have been flat.  I didn't know this, but when you cut a board with a crown/hump in it, the cut comes out curved.  That was a nightmare.

We have crown moulding to install and we expect it to be harmful to our health.  So, husband is going to buy a compound miter saw before we ("we" meaning "HE") tackle that.  Hopefully, he'll be able to finish up the rest of the shiplap without having a brain aneurism.

So, this week has been mainly cleaning up in preparation for the holiday.  Husband finished up the electrical work and installed all the lights so that we could get the boxes out of the house.  And, he cleared away most of the tools so that we can now walk across the back porch.

I love seeing something done, even if it's just putting the A/C vent on the ceiling.

We got the damaged wood floor repaired by a friend.  I put the first coat of joint compound on the bedroom wall.  Since our drywall technique left something to be desired, we had some fairly big gaps and unevenness that I had to address.  Well, it's not totally our fault.  The original drywall was kind of wonky and that's what we had to work with.

The closet is all drywalled.

Another view of the closet.  I've put the first coat of tape and bedding, but this picture was taken before that.

The vanity lights.  I had planned on having four of these, but when I got them, they were waaay bigger than I expected and four of them would have been overwhelming.  I hope I didn't make a mistake keeping them.  But, they are pretty.

I'm loving this light fixture.  It is in the center of the room and husband put a two way switch on it so that it can be turned on and off from two locations - by the exterior door and by the bedroom/bathroom entry.  I got the ceiling and most of the walls painted before we installed the lights.  

The water closet (aka toilet room) light.  Call me crazy, but I'm kind of wanting it to look like an outhouse.  Bwahaha.  Husband said it was "cozy".  I'll take that as a compliment.

To continue to read about our master bath reno, go to Part Six.


Thursday, November 09, 2017

Master Bath Renovation Part Four

This is part four of our master bathroom renovation.  Go here to start at the beginning.

The plumbers got all the rough-ins done and the concrete poured last week.  Husband and I seemed to find a week's worth of extra stuff to do to get ready to have the insulation blown in.

One thing we did was install the door.  We ordered it from Lowes.com and it took about a month to arrive.  It's a Jeld-wen and was kind of a bear to put in, but we got it done.

I really, really, really wanted to raise our ceiling.  We have a lot of angles in the attic because of the shape of our roof.  I knew it would be hard.  I would have liked to raise it all the way up to the sloped roof joists, but would have been equally happy to just raise it to right above those flat joists and have exposed beams.

But, it became clear that it was just going to be too much work to have a high ceiling.  For one thing, our A/C ducts are old school, heavy metal pipes - not those soft ducts that I'm used to seeing in the attic.  It would have been a major undertaking to move them.  So, we're just going to be boring and having a regular height ceiling.

We took out all that nasty, nasty 40 year old fiberglass insulation.  I could not believe how much dirt had accumulated.  It's not a great insulator, either.

Dirt wasn't the only thing that accumulated.  This tragic little monster came down, nearly on my head, as I pulled out the attic insulation.  GROSS!  I bet you don't know what lurks in your attic, either.

Husband chose to have cellulose insulation blown into the walls and the attic.  Basically, it's just shredded newspaper, dampened slightly so that it will stay where it is blown.  

Doesn't it look nice and neat and clean?

To keep it in the attic, they stapled up this mesh.  We can just install the ceiling directly over that.

Next up was installing the cement backboard everywhere tile is going to be.  I chose Hardie Backer.  It seemed to be the favorite of the internet tutorialists.  This is something that Husband and I have never done.  And, I never want to do it again!  It was HARD.  Hence, the name HARDie.

I watched several video tutorials and also read the Hardie instructions.  See this video?  Lies.  All lies.  The instructions and tutorials said that you can just score the Hardie board, then snap it apart.    And for circle and square cut outs, you just score it and pop it out with a hammer.  No.  You can't.

I should have took more pictures.  But, this is what happens when you score and hammer.  We were only successful with one score and snap.  Husband had to kick it hard and the cut came out terribly jagged.  We ended up cutting it with a skilsaw (circular saw) with a diamond blade.  That's supposed to be a big no-no because of the dangerous dust that it produces.  But, really, there was no other way. Seriously.  We made the cuts outside and wore masks with filters.  That was a pain in the neck because they weigh a ton and had to be carried back and forth.  For the smaller cuts, we used a jigsaw with a WOOD cutting blade.  That works a treat, but it really wears the blade down quick.

It took us two full days to get all the Hardie backer installed.  But, it's DONE!  Yippee!

Look at that.  Isn't it beautiful?

I'm going to tile five feet up from the floor, then shiplap above that.

I'm excited to start the shiplap.  We got pre-primed Ariata prime 12 foot long boards from Home Depot.  They had the best price at this time.  And, I had to have the pre-primed because I just couldn't face painting the ceiling twice.

Go here for Part Five.