Welcome to Legal Tender Farm

Welcome to Legal Tender Farm

Wednesday, February 15, 2017

Controlled Burn

Tom did a "controlled" burn of our hay pasture last week.  I didn't have it on my own agenda, but I ended up out there with him anyway.  Normally, I don't do fire.  In the past, Tom has done the burns by himself and it makes me so nervous.  I was so happy that he had traded favors with a neighbor that is a fireman so that he came over to help with the burn.

The idea is to choose a day in which the winds aren't too high and they also are blowing in the desired direction.  Then, God laughs because you think you are controlling the fire and changes the direction of the wind, whipping it up just a little for emphasis.

From the house, I noticed that the fire was suddenly bigger and faster.

I thought, "Wow, that's burning pretty fast and high and oddly close to the enormous propane tank and wood shed.   And, why are the donkeys and goats running across their paddock?"

My phone rings and it's Tom saying, "I need your help!"
Um.  Not a fireman here.

This is when the pictures stop and I grab my boots, throw my long flammable hair in a pony tail and run out to the field.

Apparently, the wind had kicked up and changed direction.  Tom and fireman neighbor managed to keep it from burning down the fences and the paddock where the donkeys were, but the garden pasture burned.  It needed to be burned anyway, but we didn't want our large piles of wood mulch to burn up.  Fireman stopped that just in time.

There was a lot of running and dragging water hoses and a little bit of panic, but the guys finally got it back under control.

Whew.  I thought we were going to burn down the county.

I bet you didn't know this, but water hoses that get holes or cuts in them can be repaired by being spliced together.  I bet, for most people, when their hose gets a hole in it, they just buy a new one.  Well, most of our hoses have multiple splices in them.  Sometimes those splices pop open or leak or get stopped up causing low water pressure at inopportune times.  I've authorized the purchase of lots of nice new water hoses before the next burn.  

Saturday, February 04, 2017

Seat Cushions

I have been so UNmotivated this winter.  I have many projects that need doing outside, but I just can't bring myself to get out there and be productive.  Super lazy is what I've been.  I'm accomplishing very little inside, too, but I did do this.

Seat cushions for my daughter-in-law's dining chairs, which she requested as a Christmas present.

I got her to make a pattern by tracing her chairs for me.  Then I pinned it on the fabric.

Since I was using a two inch thick cushion, I had to cut the fabric one and a half inches larger than the pattern.  If you're a seamstress, you will already know that the fabric is doubled so I could cut the top and the bottom piece at the same time.  The one and a half inch extra fabric is meant to allow for the thickness of the cushion, plus a half an inch seam allowance.  I marked both lines with a pencil.

The pattern is marked where the ties needed to go, so I transferred those marks, as well.

While I waiting for the patterns to arrive in the mail, I went ahead and made the welting that I would need.  I've made welting several times, but never can remember exactly how to make the bias tape, so I went back to my favorite bias tape tutorial here.   So, after I got the seat fabric cut to size, I was all ready to sew the welting onto the top piece of fabric.  For those of you new to sewing/upholstering, pin the welting to the right side of the fabric, matching up the raw edge of the welting to the raw edge of your cushion.  It will seem backwards when you do it, but don't get confused.  This is the way to do it.  Clip the seam allowance of the welting at the corners so that the welting will turn smoothly.  I used as piping foot so I could make my seam right up against the welting cord.

A reminder...cut your cushion foam with an electric knife.  I've found that using scissors just results in a big jagged mess.

I made all of the ties ahead of time and had them ready to go.  I pinned the ties the same way as the welting - right side of fabric, raw edges together, then pinned the bottom fabric piece to the top (which already has the welting sewn onto it).  After sewing it all together except for a small slot in the back, I stuffed the foam cushion in, wiggled it around until it was positioned correctly, then hand-sewed that spot securely together.

The chairs that these cushions are for have three back supports on them, one wide one in the middle back and a narrow one on either side.  Instead of having three dangling ties, which I think would look too busy, I made these little straps for the two side supports.

Theoretically (I don't have the chairs here with me to test), these little straps will just snap around those supports to keep the cushion from sliding around.

The larger support in the back will have this strap tied in a bow, like so.

 
All done!  

I made two smaller cushions for the grandson's little chairs, which are a different design that the adult chairs.  They have the traditional two back supports, hence the two ties.

The cushions are now winging their way to their destination.

HO, HO, HO!  Merry Christmas!

To see pics of cushions on chairs, go here.


Friday, February 03, 2017

Refrigerator Repair DIY

I've mentioned before and shown in previous posts that I have a husband who can fix just about anything.  Sometimes I take this for granted, but it occurred to me yesterday as he was replacing our refrigerator door gasket, that there might be people out there who are paying big bucks for repairmen or just buying a new refrigerator or freezer when the door seal breaks just because they don't know how easy it is to replace it themselves.  I know that it never has entered my mind before recently that this was even possible.

We have a Kenmore refrigerator and freezer placed side-by-side in our kitchen; bought when we remodeled our kitchen back in 2008.  They still work well, look good and serve their purposes.


But, a few months ago, we noticed that the freezer was running all the time and condensation was dripping from it.  Tom had a look at it and determined that the door gasket was torn, causing it to not seal properly.  He searched on-line and found that he could buy a gasket for our model and he ordered it.   A few weeks later, he determined that the refrigerator seal was starting to fail, so he went ahead and ordered a gasket for that one, too.  We just got around to replacing it yesterday.

It came with instructions on how to install it.  Just one little page about half the size of an 8 1/2 x 11 sheet of paper.  I know the print is too tiny to read on here, but this is just to show how simple the instructions are.  I didn't think to take pictures until we were almost done, so I can't show a step by step process.

To do the freezer was a little more complicated because we had to plan ahead to empty the contents of the door into coolers, then put plastic wrap over the freezer opening since we were going to have the freezer door open for an extended period of time.  But, for the refrigerator, we didn't need those things.  It takes less than a half an hour to do this, so it won't hurt the contents to be sitting on the counter for a while.  Although, if you keep milk or something like that in your door, you might want to put it in a cooler because after the new seal is installed, you can't open the door for an hour.

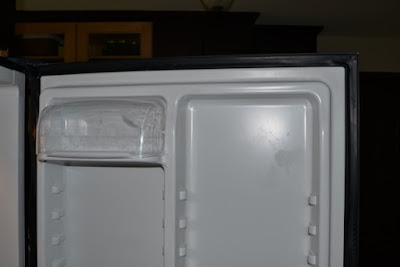
Anyway, the first thing to do is to remove the old seal.  If you lift up the edge of the seal, you can see a row of screws that goes all the way around.  Loosen those slightly, just enough so that you can gently pull the old seal off.  If you're having to tug real hard, then your screws aren't loose enough, although, you don't want the screws falling out.

Here's ours after being removed.

After that, you just put the new one in it's place.  The frame around the refrigerator door has a little groove that the lip of the gasket fits into.  Start at the top and fit that little lip into the groove all around the door.  It takes a little finessing and fiddling around, but once you get the hang of it, it goes pretty quick.

After the seal is in place, go back and tighten all the screws.  It really is that simple.  


It's so nice to have a new, clean gasket.  It makes the whole appliance look new again, which may inspire you to clean and organize your whole refrigerator.