Welcome to Legal Tender Farm

Welcome to Legal Tender Farm

Friday, November 23, 2012

Chocolate Irish Whiskey Cake - Gluten Free

While standing in line at the grocery store a couple of weeks ago, I noticed a picture of a delicious looking cake on the front of Fine Cooking magazine.  I was so taken with it, that I bought the magazine and determined to make the cake.  Oh, I am so glad I did because it is wonderful!


The cake was beautiful as well as tasty.  For a better presentation, put it on a pretty cake stand (I know I have one, but I can't find it!), and take some time to make curly chocolate shavings.  I was in a hurry on Thanksgiving morning so my shavings came out more like straight flakes.

Anyway, here is the recipe, which I adapted for us gluten free eaters:

For the cake layers

Unsalted butter and tapioca flour (or some other light gluten free flour) for the pans
2 1/4 cups (10 1/8 oz.) Bob's Red Mill Gluten Free All-Purpose Flour
1 tsp. xanthan gum*
2 cups granulated sugar
3/4 cup (2 5/8 oz.) Hershey's Special Dark cocoa
1 1/2 tsp. baking powder
1 1/2 tsp. baking soda
1 tsp. table salt
2 large eggs
1 cup whole milk
1/2 cup canola oil
1 1/2 tsp. pure vanilla extract
1 cup hot coffee

*UPDATE:  I use Namaste gluten free flour now.  If you use Namaste (or a GF flour mix that has the xanthan already in it), then omit the xanthan gum.

Position the racks in the upper and lower thirds of the oven and heat the oven to 350 degrees.  Butter and flour three 9x2 inch round cake pans,

Sift together the flour, xanthan gum, cocoa, baking powder, baking soda, and salt.  Set aside.

In a large mixing bowl, mix together the sugar and canola oil.  Add vanilla and eggs, one at a time and mix well.  Gradually mix the flour mixture and milk alternately in small amounts, beginning and ending with the flour mixture.  After the ingredients are blended well, slowly add the hot coffee with mixer on low speed, just until combined.  The batter will be quite thin.

Divide the batter equally among the three pans.  Bake, switching positions and rotating the pans halfway through, until a tester inserted in the center of the cake comes out with only a few crumbs clinging to it and the ceter feels firm to the touch, 20-25 minutes.  Let the cakes cool completely in the pans on a rack.

I had made the cake ahead, so after they cooled, I wrapped them up in plastic wrap and put them in the freezer until I was ready to assemble the cake on Thanksgiving morning.  It froze and thawed beautifully.

Make the Coffee-Whiskey Whipped Cream

1 pkg. Starbucks Via instant coffee (or 1 Tbs. instant espresso granules)
1/4 cup Irish whiskey (Jameson brand is certified gluten free)
3 cups heavy cream
3 Tbs. packed dark brown sugar.

Chill your mixing bowl and whisk attachment.  Stir the coffee granules into the whiskey until completely dissolved.  In the chilled bowl, whip all ingredients together until medium peaks form.

Assemble the Cake

I did this part while the layers were frozen, which made them easier to handle without breaking or crumbling.  Place first layer on your platter and spread about 1/3 of the cream on top.  Place second layer on top of cream and press down lightly so that the cream will ooze out the sides a little bit.  Repeat with third layer and pile the remaining cream on top.  There is plenty of cream, so I saved a cup or so to use as a coffee topping later (very yummy!).

Make the chocolate shavings

It's a good idea to do this a little ahead of time, then refrigerate them until you're ready to top the cake.

1 4 oz. block semisweet chocolate (about 1 inch thick), at room temperature
1 4 oz. block white chocolate (about 1 inch thick), at room temperature

Microwave each block of chocolate on medium power for 20-30 seconds to soften slightly, then draw a vegetable peeler along the bar's edge, letting the curls fall onto waxed paper.

Arrange the curls on top of the cake.

Take pictures of your beautiful creation, then enjoy.


Friday, November 16, 2012

Dining Chair Redo

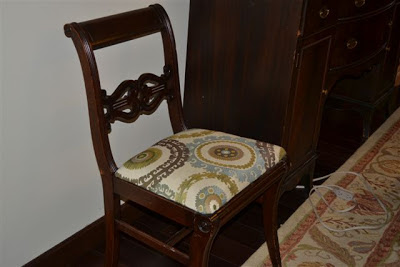
I've made a little progress on my dining chairs. 

One down, five to go.

I ended up adding a one inch foam cushion with a layer of batting over that.  It probably wouldn't have hurt to go with a two inch foam, but this will do.

Love the fabric.  It goes well with the dark furniture.

I'm not likely to get any more done before Thanksgiving, but at least this one doesn't have the bare slipcover showing and this makes it look like I've actually been accomplishing things around here.

Thursday, November 15, 2012

How Did This Happen?

When I was mowing last Saturday, this blade thing just broke off.

Weird.

The dealer sold the piece to Tom at his cost and Tom replaced it himself.

Faulty metal?

Luckily, the blade didn't go flying off.  It just went a bit askew and the belt started smoking.

Progress...If You Can Call It That

Yes, it is one week before Thanksgiving and I decided to get back to stripping the fabric off of my dining room chairs.  What is wrong with me?

This is the bottom of the seat after I have removed two layers of fabric - the one I had paid a guy to put on and the layer underneath that he was paid to remove, but didn't.

His idea of adding new padding was to put strapping across the bottom and stuff some padding between the original strapping and the new strapping.


Layers.


Down to the original seat, or whatever that underlay fabric is.  Under that is a thin layer of padding and the original strapping.


So, the question of the day is...shall I strip it all the way down and add new padding or recover the seat as is?  Or, I could add the padding on top of this old fabric.  I don't  know much about upholstery so I don't know the best way to go about this.  The easiest thing to do would be to add the padding on top, then put the new fabric on.  Does anyone know a down side to taking the easiest route?  My friend says there is enough padding already and I don't need to add any - just put the new fabric on.

Wednesday, November 07, 2012

Tuesday, November 06, 2012

Rose Arbor

I planted this rose bush last summer.  It has beautiful tiny red roses on it, but they can't really be seen because the bush tends to grow long branches flat on the ground.  So I decided it needed something to climb on.

It sort of looks like an old English phone booth, but it's not.  It's made of a set of old french doors that I got at the flea market.  Supposedly, it's from a house in Arp, Texas built in 1905.  So the old man told me, but ya' never know with those guys.

Anyway, I bought all the pieces and Jordan assembled it for me.  I broke out all the glass panes and we used the doors for the sides so the rose can, theoretically, climb up, through, and around them.  We used two by fours that we had laying around and Jordan attached the doors at the bottom to the wood so that the arbor would be stable.


I bought these decorative metal pieces (mass produced in Mexico and made to look old) to attach the doors at the tops.


We left the old hardware on, which looks kind of cool.  And I threaded the branches through the spaces where the glass used to be.


I love it and as the rose bush grows up and arches through it, it will be even better.


Thursday, October 25, 2012

Is It Really Autumn?

It's October, but my flower garden thinks it's Spring. 


The azaleas that Paden got me for Mother's Day have been in full bloom for about a month now and the roses are still going strong.  The orange one in the foreground was also a Mother's Day gift from Tom...just a stick and a root ball when I planted it.  The yellow one in the background was one that I bought at a street fair in the Spring.  I know absolutely nothing about roses, but have noticed these two have a different growth habit.  I'm very excited to see what they are like next year when they've have time to grow more.

I've forgotten what these are called, but I grew them from some of my seed-swap seeds.  They were three tiny plants that survived the chicken scratching.  I had a nice little patch of balloon flowers beside them that the hens completely destroyed (grrr!)


I also grew some Zinnia from seed.  They reseeded themselves and this one sprang up in the midst of the small Butterfly Bush.  It's such a pretty color, don't you think?  If the chickens will stay out of there, I should have quite a patch of Zinna next summer.

Birdhouse Update

Jordan has been working on the birdhouse when Tom doesn't have him knee deep in farm work.

He has chipped and sanded all the bark off of the big stump.


Then, oops, most of this side was rotted, so he took it out.  I don't think any bird would live in such an abode, but Jordan assures me that he has a plan.  It involves rocks from my front flower bed.  I am trusting in the artistic process.

He has been trying his hand at carving and having fun visiting woodworking shops (candy stores for carpenters) and buying toys...um, I mean, tools.

More to come...

Monday, October 15, 2012

Birdhouses in the Making

A few months ago Jordan cut down a dying Maple tree that was in our front yard.  He saved some piece of it make some birdhouses for me.  Not just any ol' birdhouse.  Just wait and see...


The tree was hollow in the middle, which makes it perfect for a birdhouse (or some other critter).


He saved a couple of pieces about this size.


And this huge one.


He's working on chipping all the bark off.  It's a lovely bird's eye maple underneath.


Hollowing out a knothole for a bird entrance.


A natural little opening at the bottom that looks like a little fairy door.

I'll keep you posted.  They're gonna be great!

Thursday, September 20, 2012

Dining Chair Redo

It's time to reupholster my dining room chairs; probably past time.

First of all, let me show you my dining room in my last house. 

This dining room I loved.  I know that pink ceilings are not everyone's cup of tea.  It certainly wasn't our realtor's cup of tea and he lobbied to have the whole room painted beige.  He finally won when the water heater broke and ruined some walls.  I gave him permission to have the painter paint the dining room "while he was at it".  Blah.

Anyway, I had the chairs upholstered in a pink tweed-like material.


  I paid to have it done instead of doing it myself, like I normally would, because I wanted the seats to be sort of rebuilt with new padding, because these are the most uncomfortable chairs on the planet.  Pretty, but uncomfortable.  And, you know how people won't leave the dining table after a dinner party.  I can hardly drag them away from the table and into the living room.  I can't imagine why anyone would want to sit there any longer than necessary.  So...I paid to have it done right.  Did they do it right?  No.  There was no extra padding and since the fabric covered everything, I didn't know what was under there, until now.

So, there is no pink in this farm house.  The pink must go.  While I was at Hobby Lobby buying the iron scrolly things for the doors, I saw that fabric was on sale and there was some that I really liked.  Instead of my usual waffling and agonizing, I just bought it.  Just like that.  Bought it.

Now I have this terrible, excruciating job.


Pulling the gazillion staples out to get the old fabric off.  As I was pulling it off, I saw that the old fabric was still on there and is attached with tiny little tack nails.

Man, the crummy upholsterer must have wanted to make sure that the pink fabric never came off - ever.  There are two rows of staples, most of them about a half an inch apart.  Ugh.  It may be a very long while before I get one chair done,  much less all six.    
This may be what my dining chairs look like for the coming year.


Wednesday, September 19, 2012

Repurposing

Replacing the screen on our screen doors has been something I've wanted to do since we moved to the farm.  They were full of probably thirty years worth of dirt, rust, and holes.  There were complaints of West Nile Mosquitos coming through the holes now that the weather has turned cooler and we're leaving the doors open and the A/C off.

Jordan offered to replace the screens and Tom happened to have a roll of brand new screen in his stash.  So Jordan got right on it and replaced all four in one afternoon. 

Wow, what a difference - no holes, no dirt, a clear view, and no more West Nile Mosquitos.  I was so inspired that I went on a cleaning spree and cleaned all the windows and doors across the back porch. 

So, the problem became "how to protect the screens from being pushed out and hole-poked" by big hands, little hands, and other body parts opening and closing the doors.  I ran to Lowes thinking they would have a myriad of choices, or at least a couple, of screen guards.

Nope.  They had one ugly style that I just couldn't bring myself to purchase.  So, I searched the internet...nada.  What happened to those decorative screen guards that used to be on all those screen doors that I remember from my childhood?

I did the next best thing...repurposed.

I went to Hobby Lobby and found decorative ironwork that's meant to be hung on the wall.


And I had Jordan screw them onto the door.  Voila!  Protects the screen, looks great.  At least, I think so.

Sunday, September 16, 2012

Lobster Popcorn

I'm a once-a-week popcorn eater and on that one day, I will eat popcorn for dinner.  I like to dress my popcorn up.  I make my popcorn in an air popper, so I start with a blank slate. (Sometimes, I'll have microwaved kettle corn when I'm too lazy to get the air popper out...and that's pretty lazy.)


For a few years, my favorite recipe for my popcorn was butter, salt, cayenne, and grated parmesan (or peccorino).  I often add curry powder to the mix.  For the past month or so it was simply butter, salt and black pepper. So, I bought some coconut butter this past week and thought I'd try that on my popcorn on Friday night.  I didn't want to go coconut all the way, so I halved my regular butter and replaced it with the coconut butter.  Then I added salt, a few dashes of cayenne, and my freshly ground parmesan.
And, I kid you not, it tasted like lobster.  Not bad.

And this is my gigantic popcorn bowl.  I don't fill it up, but I need lots of room to eat it from.

Sunday, September 09, 2012

The Weed Problem

We have this obnoxious weed, called goat weed, that will take over the pasture if unchecked.  It seems to be particularly bad this year.  I think it's because the drought last summer killed off so much other vegetation that it left room for the goat weed to really take a stand.

Goat weed is especially hard to kill with herbicides, but we're keeping our hay organic anyway, so Tom's answer to the goat weed problem is to pull it by hand.  He pulled for a few hours every day last week.  In one day, he counted 2,400 weeds pulled. 

This pile is waiting to be burned.

For now, thanks to the liming, the fertilizing, and the weed pulling, our hayfield looks fantastic, but new goatweed pops up every day.  The hay needs to be cut, but we're hoping for one more rain before cutting so that the fertilizer will be soaked in good and we won't lose any of the benefits.  So we're holding out for another week with our fingers crossed.

Saturday, September 08, 2012

Deer Harry

Harry showed up with this baby deer a couple of mornings ago.  We don't know if he caught it himself, stole it from a coyote, or found it dead, but to get it into the yard he had to jump at least one and possibly two fences with the deer in his mouth.  He was panting heavily, so however it was obtained took quite a bit of effort.

I felt sorry for the little thing and am glad it was dead when I saw it, otherwise I would have had to save it from Harry which could have been a bit dangerous.


Harry's the kind of dog that you don't try to take food from (except he will let Tom do it) unless you want to lose your hand.  He spent the next three days alternately hiding, burying, and consuming the little critter, all the while guarding it or it's hiding place from the chickens (as if they wanted to eat his dead deer).  As of yesterday, all that was left was the head.  I guess it's completely gone now because Harry hasn't been guarding any particular spot since yesterday afternoon.

On a lighter note...

look what I found in the garden!  I was pulling the canary melon vines (which won't stop producing those canary melons that nobody seems to want to eat) out of the raised bed and I came upon this watermelon.  I found it just in time because it's on the verge of being over ripe.  It's nice and sweet and hadn't gone mushy yet.  What a nice surprise.

Friday, September 07, 2012

More Trench Action

Next up was, or is since he's still working on it, gas and electric lines.

As a back up energy source, Tom bought an electric generator that runs on propane a couple of years ago.  Remember that giant propane tank?

A gas line must run from the tank to the generator.


Then the electric line must run from the generator to the house.

In case of a major power outage, we should be able to run the house electricity for quite some time with the propane/generator set-up.

What Has Tom Been Up To?

Y'all might think I do all the work around here. heh.  Nah, Tom works like a mule, it's just that I'm not out there with the camera when he's working and I forget to write about it. 

His big project for the last month (in the blistering heat) has been digging trenches for water, gas, and electric lines.  Up until now, the water in the barn apartment has been supplied with the same water lines as supplies the water to each paddock.  This is problematic in the winter because when the weather is freezing, the paddock waters must be turned off.  That means no water to the apartment.  Tom wanted to run a dedicated line from the well house to the barn.


So begins the trenching.


Dug with this trencher borrowed from a friend and a lot of help from Nephew.


And, thank goodness he didn't have to dig this by hand.  It was 600 feet from the well to the barn.  (This is the trench already filled in after the water line was run.)


Saturday, September 01, 2012

Well, Hello Clematis

I was surprised to see this clematis in bloom.  I planted the little sprig earlier this spring and it has been barely making it through the heat.  I certainly wasn't expecting any blooms from it this year.  But we've had a surprisingly mild August, so I guess it finally got brave enough to put on a bud when I wasn't looking.

Thursday, August 30, 2012

Burlap Bedskirt

So, since I've bought this new machine, it's time to do some projects. 

I got this burlap on sale at Hancocks several months ago to make a bedskirt for the queen bed in the barn apartment.


I bought a cheapo twin size sheet to use as the base for the skirt.  It almost fits a queen size box springs so I only have to cut off a little bit.


The great thing about burlap is that you don't have to worry about cutting straight.  You can pick a thread loose on the end and pull it all the way out.  It slides out easily.

And leaves a nice straight line through the fabric.  You can see it in the middle-right of this picture, just below that fold line.


Then you can just cut along that straight line.   I needed to find the middle of the fabric (which wasn't at the crease ironed into the fabric) so I could cut it exactly in half.  I just folded it in half and picked out a thread right at my fold and pulled the thread out.  No measuring, no marking!


It's also easy to gather.  Instead of pulling the thread all the way out, you just pull it, but hold the other end so that it doesn't pull out, gathering the fabric as you pull.


After I sewed my two long lengths (created by cutting the fabric in half, lengthwise) together, I gathered them to fit the sheet, which I had cut to the exact size of the box springs, then penned them together.  Then I sewed the whole thing together.


Since the bed has a footboard, I needed to put slits in the skirt to fit down over the legs.  I never like how skirts are split all the way up letting the box springs show.  So, I sewed mine without slits, then went back and put them in by, once again, snipping and picking a thread only the height that it needed to slip down over the bed rails, but still cover the box springs.


After I made sure everything fit, I took the bedskirt off and ironed out the crease.  Then, using a zigzag stitch, I stitched all of the raw edges to (hopefully) prevent the burlap from raveling.  It's great to use the raveling to your advantage, but unless preventative measures are taken, you can have a big raveled mess on your hands.

I pulled about six layers of thread off the bottom to give the skirt a frayed edge.  I'm considering using some hot glue on it to keep it from fraying further, but that's a project for another day if it turns out it needs it.


Finished in just a few hours!  How easy was that?!