Welcome to Legal Tender Farm

Welcome to Legal Tender Farm

Friday, February 08, 2013

Gopher Eradication

I think we finally have been presented with a system that actually works to get rid of the pocket gophers and moles!  If you'll remember back in April of 2010, I wrote about buying the "Crittergitter", which was supposed to blast exhaust fumes into the tunnels and, theoretically, suffocate the moles and/or gophers (we always call them moles, but most of what we have are actually called pocket gophers).  There were a few  problems with the Crittergitter.  First of all, it was not very convenient to use.  We had to hook up the long hose to the truck exhaust pipe and have the truck idling for hours, moving the truck and the hose around to various gopher holes.  After all that effort, we never had any proof that any gophers were killed.

 Since the drought in 2011, the gopher population has exploded and we had just about given up all hope of getting rid of them.

There are gopher mounds as far as the eye can see in nearly everyone's fields.

Then our neighbor came to us with these traps, claiming he is winning the gopher war on his property, having trapped over 400 since November.  He loaned us some of his traps and showed Tom how to set them and here's how it works.  

First, find a gopher mound, which is obviously no problem.

 The pasture denizens were very curious about this procedure.  Even the horses across the road were curiously watching.

Then scrape away the mound until you find the gopher's tunnel.  You can see the beginnings of it right there in the middle of the picture.

Clear the tunnel opening.

For whatever reason, the gopher doesn't like his tunnel to be exposed, so it will soon come to repair the hole that has been cleared.

This is the trap.

 I watched Tom set it by pinching it open and flipping the wires around somehow.

Slide the trap into the tunnel.

Push it in good and adjust the pin so that it is "hair triggerish".

Our neighbor showed Tom how to set the traps for the first time two days ago and there are now three fewer gophers digging up our hay field.  As much as I don't want the gophers messing up our property, it still was hard for me to see them in the trap and I couldn't post the gruesome picture I took.  Ew.  I just hope it was a quick death.

We probably won't have to buy dog food for a while.  Harry gladly disposes of the gophers for us.

So, if we (by "we", I mean "Tom") set several traps a day, it should just take about a half an hour a day to empty and reset them, which is way better than hours of truck idling and hose dragging.  

Looks like this is going to be part of Tom's daily routine for the coming months.


Monday, January 28, 2013

Another Project Completed

Whew.  This project has been on my list for a year.  Last year I had used the old saltillo tile to top my little retaining wall, but I ran out of usable pieces and I had no way to cut the ones I had to fit the curves.  Oddly enough, it was difficult to find a place around here that sells saltillo tile.  I would have thought that it was a common thing sold in any tile store, but that's not the case.

Anyway, I finally found a store that sells it, so a few months ago I went and picked up enough to finish the wall.


I still didn't have a way to cut it, though and the wall is pretty curvy.

A few weeks ago, Tom found and bought a cheap tile saw.  I think he got it at his favorite man shop, Harbor Freight.  The weather was lovely on Friday, so Tom set up his...


Then he got out the shiny new tile saw.


And assembled it, attaching it to the work bench.  It looked like a cheapo little contraption.


In the meantime, I gathered up the other materials needed.


And here goes the first cut.  That white tray on the bottom is full of water, which wets the saw as it spins.  I think the designer wasn't thinking ahead because as the blade spins, drawing the water up onto it, it spews the water right out onto the person operating the saw.  Tom was covered with red clay spray by the time he got done, but I forgot to get a picture of it.  So, if you want to use one of these things, it might be a good idea to have some sort of work apron unless you don't mind get it all over your clothes.  Oh yeah, and wear goggles.

And here goes the first cut.


See how dirty the water is already?  Tom had to clean the tray after every few cuts.  That was kind of laborious, but it worked out OK with both of us working.  He stopped to clean the tray while I was marking the next tile to be cut.  Despite the cheap appearance of the saw, it worked great and took us less than an hour to get the whole wall, all along the front of the house, done.


And here's the same wall pictured above.  No more gaps!

It feels so good to cross that off my list and to know that this summer, I won't have a crop of weeds growing on the top of my wall.


Wednesday, January 16, 2013

Alternate Power

Tom just about has the generator hooked up.

   It's all integrated into the electrical system in the house, new box and everything.

The only thing left to do is have the propane line hooked up.  Tom has the line running out to the tank, but the gas company has to do the actual hook up.

Tuesday, January 15, 2013

Hazards of the Goat Ranch

Ouch.  This is my leg about five days after evil goat rammed me with her head for no reason whatsoever.

This is evil goat.
Remember her?  The Kiko that was being aggressive this past summer.  She calmed down for a while, so I decided to keep her.  Now I'm beginning to think she'd made a good roast.

See that evil eye and obstinate set of the mouth?

She is a classic example of "biting the hand that feeds her", only she rams instead of bites.  Thank goodness she only used the top of her head and not the tip of her horns.  I'd get rid of her now, except that she's pregnant and I want her kids in the spring.

I can't turn my back to her while I'm feeding the goats and when she gets too close, I bang her on the horns with my metal feed scoop.  That seems to deter her until she gets busy with her food.  It doesn't hurt her, but I think the noise of metal on horn startles her.

Dreary Days

It's been cold and dreary around here for weeks.

 We had a form of precipitation called graupel yesterday morning.  I'd never seen it or heard of it before, but it was basically tiny hail.  And, of course, all of the livestock water dishes are frozen over.

Eddie cat has found a cozy place to sleep on the back porch.  That's the air intake that connects the wood burning furnace to the house.  By the way, that furnace is wonderful.  It warms up the house very nicely and so far we've only been burning wood from trees that have fallen or died or have been trimmed.


Sunday, January 13, 2013

Where Have I Been?

I haven't been posting much all through 2012 and not at all in the past month or so.  Those of you who know me personally know that my year has been kind of crazy and this past month the craziest.  Not only crazy, but horrible.

I'm not going to get into the gory details, but some of you may remember my post back in February of 2011 about my grandson, Liam's, first visit to our farm ( http://tilemosaics.blogspot.com/2011/02/farmer-liam.html ).  The fact of the matter is that his mother had just abandoned him and left him with his father, our son, who moved in with us a year ago so that I could help him with Liam while he worked.

Then, after two years, the mother came back onto the scene, deciding she wants some custody.

In a nutshell, that's it and that's what we've been dealing with since right before the holidays.  Because of the extreme distress, I simply have not felt like writing anything at all.  A sort of "writer's block", if you will.

But, I might have a few things to say in the coming days.

I ask for those of you who pray, to please do so in behalf of our sweet little guy.  Pray for all parties to put our selfish wants and needs aside and do what is best for only him and not for ourselves.  And pray for his peace, health, safety, and comfort.

Thanks to all of you out there in cyberland who are, inexplicably, interested in reading what I have to say.

Friday, November 23, 2012

Chocolate Irish Whiskey Cake - Gluten Free

While standing in line at the grocery store a couple of weeks ago, I noticed a picture of a delicious looking cake on the front of Fine Cooking magazine.  I was so taken with it, that I bought the magazine and determined to make the cake.  Oh, I am so glad I did because it is wonderful!


The cake was beautiful as well as tasty.  For a better presentation, put it on a pretty cake stand (I know I have one, but I can't find it!), and take some time to make curly chocolate shavings.  I was in a hurry on Thanksgiving morning so my shavings came out more like straight flakes.

Anyway, here is the recipe, which I adapted for us gluten free eaters:

For the cake layers

Unsalted butter and tapioca flour (or some other light gluten free flour) for the pans
2 1/4 cups (10 1/8 oz.) Bob's Red Mill Gluten Free All-Purpose Flour
1 tsp. xanthan gum*
2 cups granulated sugar
3/4 cup (2 5/8 oz.) Hershey's Special Dark cocoa
1 1/2 tsp. baking powder
1 1/2 tsp. baking soda
1 tsp. table salt
2 large eggs
1 cup whole milk
1/2 cup canola oil
1 1/2 tsp. pure vanilla extract
1 cup hot coffee

*UPDATE:  I use Namaste gluten free flour now.  If you use Namaste (or a GF flour mix that has the xanthan already in it), then omit the xanthan gum.

Position the racks in the upper and lower thirds of the oven and heat the oven to 350 degrees.  Butter and flour three 9x2 inch round cake pans,

Sift together the flour, xanthan gum, cocoa, baking powder, baking soda, and salt.  Set aside.

In a large mixing bowl, mix together the sugar and canola oil.  Add vanilla and eggs, one at a time and mix well.  Gradually mix the flour mixture and milk alternately in small amounts, beginning and ending with the flour mixture.  After the ingredients are blended well, slowly add the hot coffee with mixer on low speed, just until combined.  The batter will be quite thin.

Divide the batter equally among the three pans.  Bake, switching positions and rotating the pans halfway through, until a tester inserted in the center of the cake comes out with only a few crumbs clinging to it and the ceter feels firm to the touch, 20-25 minutes.  Let the cakes cool completely in the pans on a rack.

I had made the cake ahead, so after they cooled, I wrapped them up in plastic wrap and put them in the freezer until I was ready to assemble the cake on Thanksgiving morning.  It froze and thawed beautifully.

Make the Coffee-Whiskey Whipped Cream

1 pkg. Starbucks Via instant coffee (or 1 Tbs. instant espresso granules)
1/4 cup Irish whiskey (Jameson brand is certified gluten free)
3 cups heavy cream
3 Tbs. packed dark brown sugar.

Chill your mixing bowl and whisk attachment.  Stir the coffee granules into the whiskey until completely dissolved.  In the chilled bowl, whip all ingredients together until medium peaks form.

Assemble the Cake

I did this part while the layers were frozen, which made them easier to handle without breaking or crumbling.  Place first layer on your platter and spread about 1/3 of the cream on top.  Place second layer on top of cream and press down lightly so that the cream will ooze out the sides a little bit.  Repeat with third layer and pile the remaining cream on top.  There is plenty of cream, so I saved a cup or so to use as a coffee topping later (very yummy!).

Make the chocolate shavings

It's a good idea to do this a little ahead of time, then refrigerate them until you're ready to top the cake.

1 4 oz. block semisweet chocolate (about 1 inch thick), at room temperature
1 4 oz. block white chocolate (about 1 inch thick), at room temperature

Microwave each block of chocolate on medium power for 20-30 seconds to soften slightly, then draw a vegetable peeler along the bar's edge, letting the curls fall onto waxed paper.

Arrange the curls on top of the cake.

Take pictures of your beautiful creation, then enjoy.


Friday, November 16, 2012

Dining Chair Redo

I've made a little progress on my dining chairs. 

One down, five to go.

I ended up adding a one inch foam cushion with a layer of batting over that.  It probably wouldn't have hurt to go with a two inch foam, but this will do.

Love the fabric.  It goes well with the dark furniture.

I'm not likely to get any more done before Thanksgiving, but at least this one doesn't have the bare slipcover showing and this makes it look like I've actually been accomplishing things around here.

Thursday, November 15, 2012

How Did This Happen?

When I was mowing last Saturday, this blade thing just broke off.

Weird.

The dealer sold the piece to Tom at his cost and Tom replaced it himself.

Faulty metal?

Luckily, the blade didn't go flying off.  It just went a bit askew and the belt started smoking.

Progress...If You Can Call It That

Yes, it is one week before Thanksgiving and I decided to get back to stripping the fabric off of my dining room chairs.  What is wrong with me?

This is the bottom of the seat after I have removed two layers of fabric - the one I had paid a guy to put on and the layer underneath that he was paid to remove, but didn't.

His idea of adding new padding was to put strapping across the bottom and stuff some padding between the original strapping and the new strapping.


Layers.


Down to the original seat, or whatever that underlay fabric is.  Under that is a thin layer of padding and the original strapping.


So, the question of the day is...shall I strip it all the way down and add new padding or recover the seat as is?  Or, I could add the padding on top of this old fabric.  I don't  know much about upholstery so I don't know the best way to go about this.  The easiest thing to do would be to add the padding on top, then put the new fabric on.  Does anyone know a down side to taking the easiest route?  My friend says there is enough padding already and I don't need to add any - just put the new fabric on.

Wednesday, November 07, 2012

Tuesday, November 06, 2012

Rose Arbor

I planted this rose bush last summer.  It has beautiful tiny red roses on it, but they can't really be seen because the bush tends to grow long branches flat on the ground.  So I decided it needed something to climb on.

It sort of looks like an old English phone booth, but it's not.  It's made of a set of old french doors that I got at the flea market.  Supposedly, it's from a house in Arp, Texas built in 1905.  So the old man told me, but ya' never know with those guys.

Anyway, I bought all the pieces and Jordan assembled it for me.  I broke out all the glass panes and we used the doors for the sides so the rose can, theoretically, climb up, through, and around them.  We used two by fours that we had laying around and Jordan attached the doors at the bottom to the wood so that the arbor would be stable.


I bought these decorative metal pieces (mass produced in Mexico and made to look old) to attach the doors at the tops.


We left the old hardware on, which looks kind of cool.  And I threaded the branches through the spaces where the glass used to be.


I love it and as the rose bush grows up and arches through it, it will be even better.


Thursday, October 25, 2012

Is It Really Autumn?

It's October, but my flower garden thinks it's Spring. 


The azaleas that Paden got me for Mother's Day have been in full bloom for about a month now and the roses are still going strong.  The orange one in the foreground was also a Mother's Day gift from Tom...just a stick and a root ball when I planted it.  The yellow one in the background was one that I bought at a street fair in the Spring.  I know absolutely nothing about roses, but have noticed these two have a different growth habit.  I'm very excited to see what they are like next year when they've have time to grow more.

I've forgotten what these are called, but I grew them from some of my seed-swap seeds.  They were three tiny plants that survived the chicken scratching.  I had a nice little patch of balloon flowers beside them that the hens completely destroyed (grrr!)


I also grew some Zinnia from seed.  They reseeded themselves and this one sprang up in the midst of the small Butterfly Bush.  It's such a pretty color, don't you think?  If the chickens will stay out of there, I should have quite a patch of Zinna next summer.

Birdhouse Update

Jordan has been working on the birdhouse when Tom doesn't have him knee deep in farm work.

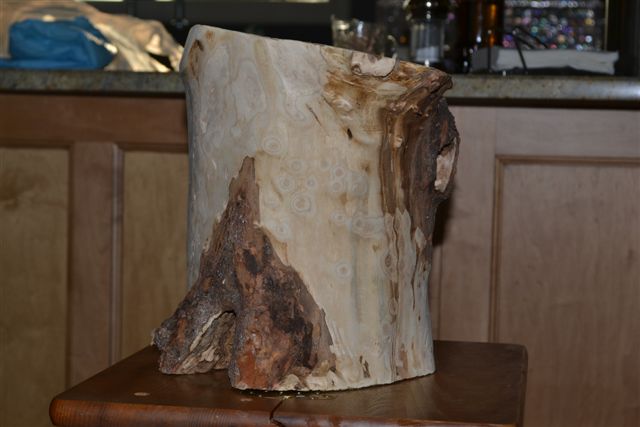
He has chipped and sanded all the bark off of the big stump.


Then, oops, most of this side was rotted, so he took it out.  I don't think any bird would live in such an abode, but Jordan assures me that he has a plan.  It involves rocks from my front flower bed.  I am trusting in the artistic process.

He has been trying his hand at carving and having fun visiting woodworking shops (candy stores for carpenters) and buying toys...um, I mean, tools.

More to come...

Monday, October 15, 2012

Birdhouses in the Making

A few months ago Jordan cut down a dying Maple tree that was in our front yard.  He saved some piece of it make some birdhouses for me.  Not just any ol' birdhouse.  Just wait and see...


The tree was hollow in the middle, which makes it perfect for a birdhouse (or some other critter).


He saved a couple of pieces about this size.


And this huge one.


He's working on chipping all the bark off.  It's a lovely bird's eye maple underneath.


Hollowing out a knothole for a bird entrance.


A natural little opening at the bottom that looks like a little fairy door.

I'll keep you posted.  They're gonna be great!