I got this burlap on sale at Hancocks several months ago to make a bedskirt for the queen bed in the barn apartment.
I bought a cheapo twin size sheet to use as the base for the skirt. It almost fits a queen size box springs so I only have to cut off a little bit.
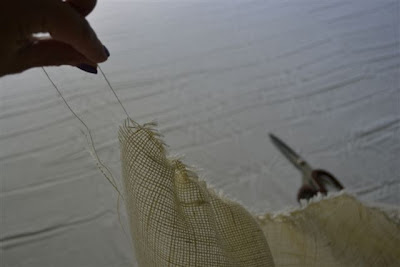
The great thing about burlap is that you don't have to worry about cutting straight. You can pick a thread loose on the end and pull it all the way out. It slides out easily.
And leaves a nice straight line through the fabric. You can see it in the middle-right of this picture, just below that fold line.
Then you can just cut along that straight line. I needed to find the middle of the fabric (which wasn't at the crease ironed into the fabric) so I could cut it exactly in half. I just folded it in half and picked out a thread right at my fold and pulled the thread out. No measuring, no marking!
It's also easy to gather. Instead of pulling the thread all the way out, you just pull it, but hold the other end so that it doesn't pull out, gathering the fabric as you pull.
After I sewed my two long lengths (created by cutting the fabric in half, lengthwise) together, I gathered them to fit the sheet, which I had cut to the exact size of the box springs, then penned them together. Then I sewed the whole thing together.
Since the bed has a footboard, I needed to put slits in the skirt to fit down over the legs. I never like how skirts are split all the way up letting the box springs show. So, I sewed mine without slits, then went back and put them in by, once again, snipping and picking a thread only the height that it needed to slip down over the bed rails, but still cover the box springs.
After I made sure everything fit, I took the bedskirt off and ironed out the crease. Then, using a zigzag stitch, I stitched all of the raw edges to (hopefully) prevent the burlap from raveling. It's great to use the raveling to your advantage, but unless preventative measures are taken, you can have a big raveled mess on your hands.
I pulled about six layers of thread off the bottom to give the skirt a frayed edge. I'm considering using some hot glue on it to keep it from fraying further, but that's a project for another day if it turns out it needs it.
Finished in just a few hours! How easy was that?!


