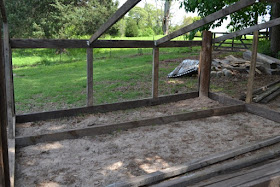
Well, I got on craigslist.com and found some free building supplies and our neighbor, who was tearing down his old pole barn, let Tom tear down and take part of the lumber for free.
So, we finally got around to building a new one (for under $1,000 *wink*). It's not quite done, but I'm so excited that I couldn't wait to write about it.
We built a basic pole barn structure.
Approximately twelve feet wide by twenty-four feet long.
Tom set the support poles. If you build a structure like this, using these creosote logs as supports, you are not supposed to use concrete. You just dig a deep hole (I think ours were about four feet deep), set the pole in it and pack the dirt back in. Concrete will make the wood rot.
After setting the poles and making sure they were level, we added two-by-six beams for the roof support.
The outside 2x6's were screwed directly into the poles, but the others were hung with joist supports, which are supposed to hold the frame together better in high winds.
Tom sent me to Home Depot to pick these up. What's funny is that the clerk at Home Depot asked me what they were and what they are used for. I could barely find them without help.
Next, we attached 1x6 boards crossways on the 2x6's. That's what the tin roof will be screwed onto.
Tom had this idea to make the yard even bigger by building what we call a "bump out". It's 8x12 and juts off the side of the main structure. This part will have a wire mesh roof rather than tin because I'm going to put a little herb garden in there for the chickens. Yes, I said "herb garden". Don't be hatin'.
Here's the bump out from a different angle. That back part will contain the herb garden.
We used one of the old screen doors that we took off of our house when we remodeled. We seem to have an endless supply of those. I painted it to match the red on the other structures around the property. It looks crooked in the picture, but I assure you, it is level. The sloping ground and roof make everything that is level look wonky.
Chicken patio. Yes, the chickens needed a patio. (More of the endless supply of terra cotta tiles that we took out of the house, too)
Next, Tom put 2x4 uprights at four foot intervals so that I can staple my 48 inch wire mesh to it.
Last last bit of framing was for the little chicken door. We let our chickens free range most of the time, so they need to be able to come and go to lay their eggs and get a drink. We built it out of a 1x4, cutting it into four 12 inch strips. The fourth strip got ripped in half and screwed to the other three to hold it all together. We used hinges from some cabinet doors that we took out of the RV.
When it's open, it's a ramp.
All of the framing is finished. I'm waiting for the ordered wire mesh to arrive. Tom wants to let the poles settle in real good before he puts the roof on. He is convinced that it is going to fly away like a kite when he puts the roof on and is considering buying some kind anchors that screw into the ground and attach to the poles that helps hold them in. I don't know. Nothing else (without anchors) has flown away around here, but...what do I know? Supposedly, when you build a roofed, but open structure like this, it's supposed to face a certain direction so the wind won't pick it up.
View almost finished project here.


No comments:
Post a Comment
Talk to me.