Welcome to Legal Tender Farm

Welcome to Legal Tender Farm

Friday, October 30, 2015

Vardo, Part Five

Hey, after, what? nearly two years?  I've finally started up work again on the Gypsy Vardo.  Well, to be fair to myself, I had started sewing the curtains some time between then and now, but I hit a snag and, true to form, got discouraged and put it on the back burner.

I'm back in full force now.  I finished all of the curtains and installed them.  Now the sun is not beaming in like crazy and fading everything in sight.  Hanging curtains before the walls are done is really not the proper way to go about a redo, but it was something that I could accomplish (once I got past my snafu and solved the problem on how to hang the curtains) and I needed to see some progress so that I could feed off it and get going on another part.

I've started the kitchen backsplash.  The one thing that was holding me back on that was the indecision about putting up the backer board for the tile.  I thought I was going to have to take down the paneling and expose the studs, but I thought to consult builder Nephew and he said, "don't take it down".  Yay!  Just what I wanted to hear.  His suggestion was to pull off the wallpaper and use Liquid Nails to glue the backer board onto the wall.

I watched a tutorial on how to cut backer board (or hardy board).  On the simple straight cuts, I just scored it, then snapped it apart.  On the trickier cuts, I used a jigsaw.  I'm kind of afraid of power saws, but I bravely overcame it and got all my pieces cut out.  Nephew showed me how to glue the pieces to the wall and put a few screws to hold it in place while it dried.  I finished it up this morning and am now ready to work on my tile design.


Other posts on the trailer-to-vardo transformation are here
Saturday, October 24, 2015

Are Hyacinth Beans Edible?

Since I didn't have much growing in the garden this year, I put a few Hyacinth Bean seeds in the ground just to see how they'd do.  I grew the vine at our last house and I loved it because it was always so lush and beautiful.  But, since we've moved out here, I've tried to get it to grow on a trellis and the fence, but it hasn't done well.

It really took off in the garden plot and is producing beautiful, shiny, purple pods like crazy.  I've always wondered if they were edible, but was afraid to try them because I thought they might turn my mouth purple, or worse, kill me.

So, I did some searching on the internet and was assured that if you eat the fresh pods, they are perfectly harmless, although, eating the dried bean is a different story.  When the beans are mature and the pod dries up, the bean contains a toxin.  They can still be eaten, but they have to be cooked twice, changing the water in between cooking so that the toxin can be released, boiled, and poured away.

I finally got up the nerve to try them, and, ugh.  NOT GOOD!

They are this nice beautiful purple color when they start out.  I thought they'd look so pretty on the plate with my baked salmon and herbed rice.  But, when I steamed them, they lost their color and turned into an icky greenish-grey color.

I was determined to answer the question for myself of whether or not they were edible, so I went ahead and served them up.

The answer is, YES, they are edible...if you mean by "edible" that "they won't kill you".  Tom and I both ate them and suffered no ill effects.  But, aside from the creepy color, they did not taste good.  I was expecting the taste and texture of a snow pea pod (which is one of my favorite veggies), but it was nothing like that.  Only the smallest, flattest ones were tender.  The taste wasn't putrid, but it wasn't good.  The texture was the worst, although Tom didn't notice it.  But, I'm more of a food texture person than he is.  Anyway, they had a fuzzy texture.  Almost like a peach fuzz texture, except not in a good peachy way.

So, yeah, you can eat Hyacinth Beans....if you're starving.

More Flooding

Remember the flooding we had in the spring that washed away the pond spillway?  Remember the installation of the culverts that was supposed to prevent another such incident?  Well, so much for that.  This is our pond spillway now.


The water went through, around, and over the culverts, washing away the soil and the new grass that had sprouted.  Tom tried, futilely, to brace it up with sandbags.  Some of them were just tossed downstream like driftwood.

It started raining Friday morning and hasn't stopped.  It's now 10:30 Saturday morning and we've gotten about 16 inches of rain so far.  It's supposed to rain until Sunday morning.

Those two things that look like logs are the culverts that were covered with soil and new grass.  Since Tom took this video, the soil has eroded away all the way to the front of the culverts.  They're just useless pipes lying there now.

Saturday, October 17, 2015

Chicken Coop Remodel, or How Not to Build a Chicken Coop (2)

To read day one of the chicken coop remodel, go here.

The chickens were completely freaked out by the changes to their home.  The first night, many of them wouldn't even go in the coop.  They tried roosting in the mower shed and on top of the coop yard fence.  I had to catch them and put them in the coop for the night.

In the morning, the chickens are usually out of the coop and clamoring around the gate waiting to be let out.  But after the first night of the remodel, I went to open up the coop to get started on the walls and all of the chickens were just sitting on the roost, apparently afraid to jump down onto the new floor.  I finally coaxed and shooed them out the door.

On day two, we put the linoleum on the floor and put the ceiling up and started on the walls.  On day three, we finished all of the walls.  I didn't take pictures of any of that because, frankly, I was too exhausted to care about pictures.

On day four, Tom had to go out of town and I spent the day painting the walls and ceiling.

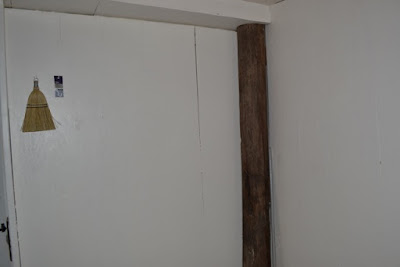
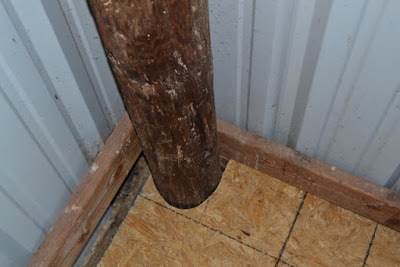
I bought some mis-tinted paint at a local surplus store, exterior latex.  The first coat was a very light lavender.  I covered that up with a second coat of white.  I left the corner support poles unpainted because they're old creosoted telephone poles.  I hung a couple of cup hooks on the wall to store some cleaning supplies. Little whisk broom for sweeping away cobwebs and such.  My hope is to do a little regular maintenance so that the filth doesn't build up to an unmanageable level like before.

It won't win any beauty contests, but I think this set up is going to make life a bit easier for us.  The neat freak in me wants to caulk every seam and corner, but chicken coops need plenty of ventilation, so I don't want to seal it all up and make it airtight.  We left a big space in the ceiling open so the air can circulate up through the rafters.  We're going to cover that space with half inch hardware cloth so that it's snake proof, but will still allow airflow.  Still to come...a new, easier to clean roost and sand on the floor instead of the hay that we've been using as litter.  (Do a google or Pinterest search on using sand.  There are a lot of positive things about it, so we're going to give it a try).


Chicken Coop Remodel, or How Not To Build a Chicken Coop

Remember when we first moved to the farm?  Oh, how bright-eyed and naive we were.  Remember the Chicken Palace?  Well, it's not so palace-y anymore.  We built our chicken coop before the days of Pinterest and endless pictures and tutorials about chickens and beautiful, functional coops.  And, we pretty much didn't know what we were doing.  These days, this is what our coop looks like on the inside.

Poop and filth in every nook and cranny.  This is so hard to clean.  At the time, it seemed like such a good idea to use the R-panel tin for the walls.  And, yes, it has served us well since 2009.  But, ugh, it is almost impossible to clean.

The tile floor that I originally laid (using the saltillo tile that we took out of the house) has held up well in the middle, but all around the edges, the smaller pieces of tile have been dislodged by gophers or moles digging tunnels underneath and the chickens scratching around for bugs and such.

I don't know if that's a rat nest of a bird nest, but I know that I don't want it there.  And spiders...eek, the spider webs are everywhere.

Snakes have such easy access that this one felt at home enough to take it's coat off and stay a while.  There are lots of crevices where they can hide and even if we can find them, sometimes we can't reach them to get them out.

Tom was usually the one to clean the coop, but it's such an onerous task that it wasn't done nearly enough.  Even so, he was reluctant to go along with my plan to remodel the coop.  I finally talked him into it and went to buy supplies.  My plan was to put in a proper floor that we could cover with linoleum and put in proper walls to seal off all the hidey holes.

Floor joists, first.

This was a hard project.  Not only did we have a sloping roof that we had to cut the plywood to fit at the proper angel, we had these corner poles that we had to fit the floor around.  It was a challenge. 

But, with Tom's mad trigonometry skills, we managed to get through it with few errors.

Although, the circles were the worst.  

Almost fits.

This one we cut far too big.  Tom filled in the gap with the pieces we cut off.

The fourth time's a charm. 

We finished the floor on the first day.