Welcome to Legal Tender Farm

Welcome to Legal Tender Farm

Tuesday, December 17, 2013

Losing a Big Oak, Gaining Firewood

We had this wonderful old oak tree die last summer.  It had been ailing, I'm not sure why, but had a big spot on it that we had the Arbor Barber treat a couple of years ago.  I think the drought finally did it in despite my faithful watering.


The tree is right by the much used path that leads from the house to the barn.  We were afraid that it might start dropping branches on us as we walked back and forth.  In addition to that, we need more firewood.  We are shocked at how much wood we're using this year.  Tom had the wood shed completely stuffed with wood and we were all ready for the winter.  But, winter came early to Texas this year.  We're getting many days of freezing temperatures and we've already used half (maybe more, I haven't looked in a few days) of the wood Tom had stored up.

Thankfully, we're having a nice mild week and are able to get some farm work done.  Cutting this tree down is one of Tom's goals.

An acquaintance of ours has this cherry picker that was broken.  Tom fixed it for him, so he's letting Tom use it for free.

Driving the cherry picker, Tom is maneuvering the bucket into place.

He's using a chainsaw on a stick.  As a side note, this is why it is nearly impossible for me to buy Tom a Christmas present.  This morning he said to me, "You know, if you want to get me an early Christmas present, I sure would like to have one of those chainsaws on a stick (I'm pretty sure that's not the technical term for it, but I can't really remember what he called it) like your brother has.  I think it would be safer to use."  I got all excited and planned to go get him one this very afternoon because I have yet to think of anything he would want for Christmas.  But, within the space of about ten minutes, he had gotten on the internet, found the best one for the best price and in five more minutes, was on his way to Tractor Supply to buy it for himself.  

Well, so much for that idea.

Up in the sky, ever so high.

He got all the major branches off and just has the main trunk to deal with tomorrow.  That there is a big load of firewood already.  He probably won't be able to fit the whole thing in the woodshed.

I hated to lose that tree, but there are two or three smaller ones surrounding it that will benefit from the sunlight that they will now receive.


Saturday, December 14, 2013

Vardo, Part One

I've embarked upon a new project, mostly just for fun and to satisfy my decorating appetite.  This one will probably be a long drawn out process (I still haven't finished recovering my dining room chairs from last year at this time...well, I did predict that it would probably take me a year or more) for three reasons:  (1) I'm a procrastinator; (2) I seem to be able to work on these kind of projects only when the mood strikes...and the mood doesn't always strike often enough; (3) It's big, so I'm only setting small area goals.

Well, enough of that.  I'm turning our  travel trailer  into my version of a Gypsy Vardo.  If you'll remember, the trailer had leaks which Nephew repaired by completely tearing out and rebuilding.


Instead of replacing the cabinetry that was on this wall, I had him fill the wall with shelving.  I thought it would be better use of the space.

You can't see the whole wall (in the back) because the slide-out is in, but where there were once upper and lower cabinets with dead space in between, there is now an entire wall of open shelving.

Painting the shelving was the first thing I did.  It was the most easily implemented part of the plan; something I could accomplish quickly and cheaply without getting discouraged by the enormity of the project.  To save money, I went to the local paint stores and bought their "mis-tints".  Those are the paints that were custom made for customers who decided that they didn't like the color so they returned them to the store.  I got a gallon of Sherwin Williams premium flat paint in a neutral color for one buck.  I used it as a primer instead of buying their regular primer, which is probably 20-30 bucks.  The only paint I had to buy for regular price was the red because I couldn't find a mistinted red and I really wanted to get finished with this part.  

I also painted the kitchen cabinets with a mis-tint.  You can see the teal color in the bottom left hand corner of the picture above.  Even though I'm finished painting them, I'm not ready to show the kitchen yet because I still have some work to do on it.

To finish this wall, I had to make the curtain for the window.

I ordered enough red velvet from Hobby Lobby to do all of the windows in the trailer.  There wasn't enough room to mount the curtain rod the way it's supposed to be (on the wall at the corners of the window) and I had to hang it from the shelf above.  It's not ideal, but it works.

And I got these at the flea market, which are looking pretty tiny all alone on the shelves.

Y'all might be wondering why in the world I'm doing this.  Well, besides the "fun" aspect of it, I really can't see this travel trailer ever doing any more traveling.  Because of the leaks, I couldn't, in all good conscience, sell it to anyone who wanted to use it as it was intended.  I decided we should keep it as overflow guest quarters and for living space for family in the event of an economic crash (and I feel compelled to say "which we are hoping won't happen, but Tom still thinks it will").

So...I want it to be comfortable and cozy for guests, but I can't fill it up with a bunch of unnecessary, (but cool) stuff, because if someone actually has to live in it, they'll need the space for their own stuff.  But, I need to put the necessities in there for guests.  I'll be keeping my eyes peeled for colorful old china dishes, rugs, etc. at the flea markets, junk shops, and on-line.


Thursday, December 05, 2013

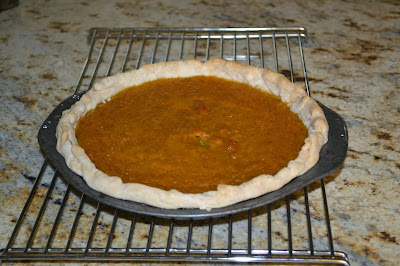
Gluten Free Pumpkin Pie

Since I have all of these homegrown pumpkins, it seemed a crime not to have pumpkin pie at our Thanksgiving dinner, so I added it to the menu.  My mom usually brings pecan and pumpkin pie, so I haven't had much practice making gluten free crust.  Even when I used to eat gluten, when I made pies I would use the Pillsbury pre made crust that I just had to roll out and put in the pan.  Then when I started eating gluten free, on the rate occasion that I made a pie, I'd use a mix.  Since I decided sort of late in the game that we should have pumpkin pie, I didn't have a mix on hand.

I thought it wouldn't be a problem because I knew that there was a pie crust recipe on my favorite go-to website for baking gluten free, gluten free pie crust .  I was happy to have all of the ingredients on hand and the recipe looked easy enough.  I made it a couple of days in advance and let it sit in the refrigerator until I was ready to roll it out.

The pie crust recipe consist of three kinds of gluten free flours, xanthan gum, salt, and water.  Part of the instructions say, "For a tender crust, pinch and rub the shortening into the flour with your fingers until the flour is the consistency of cornmeal.  If you want a flaky crust, then measure out your shortening and divide it into small pieces.  Freeze those pieces and then cut them into your dough.   You can use a pastry cutter or just press the thin pieces with your fingers.  You want the shortening to be visible and in thin, flaky pieces."  I rubbed the shortening and flour with my fingers, but it never became the consistency of cornmeal.  Instead, it became a sticky mess which coated my hands and fingers and I had to scrape it off with a butter knife.

I don't blame the recipe.  I blame my inexperience, but it did turn out OK.  I tasted it after I had it all mixed up and ended up adding three teaspoons of sugar to it because I just had to have a tiny bit of sweetness in my crust.

After a couple of days in the fridge, the pie crust rolled out just fine and I was able to use it for my pumpkin pie.

Then I got to looking at my pumpkin pie recipes and all of them had cans of evaporated milk in them.  I didn't have any of that in my pantry.  It's not something that I usually stock.  So, I googled "pumpkin pie without evaporated milk" and came up with this:

1 pastry for single-crust pie
2 eggs, slightly beaten
2 cups fresh pumpkin puree
1/4 cup half-and-half OR light cream OR regular milk
(I used 1/8 cup heavy cream and 1/8 cup goat milk)
3/4 cup granulated sugar
1 Tbs. all-purpose gluten free flour (I used Bob's Red Mill)
1 tsp. vanilla
1/4 tsp. salt
1/4 tsp. ground cinnamon
1/4 tsp. ground nutmeg
1/8 tsp. ground allspice
1/4 tsp. ground ginger

Prepare and roll pastry for single-curst pie.
Line 9" pie plate with pastry.
Trim; crimp edges as desired (Martha Stewart's website has good ideas for this)
Stir together eggs, pumpkin, and milk/cream
Stir in sugar, flour, vanilla, salt, cinnamon, nutmeg, ginger, and allspice.
Pour pumpkin mixture into pastry.
To prevent over browning, cover edge of pie with foil for the first 10 minutes of cooking time.
Bake in 375 F oven for 25-30 minutes, or until knife inserted in center comes out clean.
Cook on wire rack.
Cover and refrigerate within two hours.

This pie was delicious.  Definitely a recipe to keep.  In fact, I'm going to throw out all of my other pumpkin pie recipes (well, except my Martha Stewart chocolate pumpkin pie, which I haven't tried yet).  Who needs evaporated milk?

The crust was delicious, too, and held together well, which is important for gluten free baking.